
Space product assurance
Microbial examination of flight hardware and cleanrooms
Foreword
This Standard is one of the series of ECSS Standards intended to be applied together for the management, engineering and product assurance in space projects and applications. ECSS is a cooperative effort of the European Space Agency, national space agencies and European industry associations for the purpose of developing and maintaining common standards. Requirements in this Standard are defined in terms of what shall be accomplished, rather than in terms of how to organize and perform the necessary work. This allows existing organizational structures and methods to be applied where they are effective, and for the structures and methods to evolve as necessary without rewriting the standards.
This Standard has been prepared by the ECSS-Q-ST-70-55 Working Group, reviewed by the ECSS Executive Secretariat and approved by the ECSS Technical Authority.
Disclaimer
ECSS does not provide any warranty whatsoever, whether expressed, implied, or statutory, including, but not limited to, any warranty of merchantability or fitness for a particular purpose or any warranty that the contents of the item are error-free. In no respect shall ECSS incur any liability for any damages, including, but not limited to, direct, indirect, special, or consequential damages arising out of, resulting from, or in any way connected to the use of this Standard, whether or not based upon warranty, business agreement, tort, or otherwise; whether or not injury was sustained by persons or property or otherwise; and whether or not loss was sustained from, or arose out of, the results of, the item, or any services that may be provided by ECSS.
Published by: ESA Requirements and Standards Division
ESTEC, P.O. Box 299,
2200 AG Noordwijk
The
Copyright: 2008 © by the European Space Agency for the members of ECSS
Change log
|
ECSS-Q-ST-70-55A
|
Never issued
|
|
ECSS-Q-ST-70-55B
|
Never issued
|
|
ECSS-Q-ST-70-55C
|
First issue
|
Introduction
The UN Outer Space Treaty of 1967 sets up the general principles applicable to the exploration and use of outer space. Article IX of the Outer Space Treaty constitutes the primary statement of international law:
“States parties shall pursue studies of outer space, including the Moon and other celestial bodies, and conduct exploration of them so as to avoid their harmful contamination and also adverse changes in the environment of the Earth resulting from the introduction of extraterrestrial matter and, when necessary, adopt appropriate measures for this purpose”.
Harmful contamination in that sense is defined as biological contamination, including organic-constituents, to protect the environment in order to allow future exobiology research. The Committee On Space Research (COSPAR) has established some planetary protection guidelines, based on the Outer Space Treaty. These guidelines impose requirements on spaceflight missions according to target body/mission type combinations.
The objective of this Standard is to ensure that the proper procedures for establishing the microbiological contamination on flight hardware and controlled environments are in place to meet the planetary protection constraints.
Scope
This standard defines test procedures for quantitative and/or qualitative microbiological examination of surfaces of flight hardware and in microbiologically controlled environments (e.g. cleanroom surfaces, cleanroom air, isolator systems).
The following test methods are described:
Surface and air sampling and detection of biological contaminants with swabs, wipes, contact plates and air samplers, followed by cultivation for bioburden determination.
Sampling of biological contaminants by DNA analysis from swabs and wipes.
The test methods described in this standard apply to controlling the microbiological contamination on all manned and unmanned spacecraft, launchers, payloads, experiments, ground support equipment, and cleanrooms with planetary protection constraints.
This standard does not address molecular contamination control.
This standard does not address the principles and basic methodology for controlling cleanrooms and associated controlled environments with constraints on particulate contamination.
This standard may be tailored for the specific characteristic and constrains of a space project in conformance with ECSS-S-ST-00.
Normative references
The following normative documents contain provisions which, through reference in this text, constitute provisions of this ECSS Standard. For dated references, subsequent amendments to, or revision of any of these publications do not apply, However, parties to agreements based on this ECSS Standard are encouraged to investigate the possibility of applying the more recent editions of the normative documents indicated below. For undated references, the latest edition of the publication referred to applies.
|
ECSS-S-ST-00-01
|
ECSS system – Glossary of terms
|
|
ECSS-Q-ST-10-09
|
Space product assurance – Nonconformance control system
|
|
ECSS-Q-ST-20
|
Space product assurance - Quality assurance
|
|
ECSS-Q-ST-70-01
|
Space product assurance - Cleanliness and contamination control
|
Terms, definitions and abbreviated terms
Terms defined in other standards
For the purpose of this Standard, the terms and definitions from ECSS-S-ST-00-01 apply.
Terms specific to the present standard
bioburden
quantity of viable microorganisms measured with a specified assay
biodiversity
identification of type of microorganism, measured with specified assays
anaerobic
gas with 40 ppm O2
Abbreviated terms
For the purpose of this Standard, the abbreviated terms from ECSSSST-0001 and the following apply:
|
Abbreviation
|
Meaning
|
|
ASTM
|
American Society for Testing and Materials
|
|
DNA
|
Desoxyribonucleic acid
|
|
DNase
|
Deoxyribonuclease
|
|
IEST
|
Institute of Environmental Sciences and Technology
|
|
IPA
|
Isopropylalcohol
|
|
ISO
|
International Organization for Standardization
|
|
PBS
|
Phosphate buffered saline solution
|
|
PCR
|
Polymerase chain reaction
|
|
PDA
|
Potato Dextrose Agar
|
|
R2A
|
A low nutrient bacterial medium with agar
|
|
rDNA
|
Ribosomal DNA
|
|
RNase
|
Ribonuclease
|
|
S
|
Svedberg unit
|
|
TE
|
Tris-EDTA, 2-Amino-2-(hydroxymethyl)propane-1,3-diol ethylenediaminetetraacetic acid
|
|
TSA
|
Trypticase Soy Agar
|
|
TGA
|
Thioglycollate Agar
|
Principles
The activities related to microbial examination requirements, specifications, procedures and reports are described in Figure 41, and the related standardization requirements are captured in clause 5.
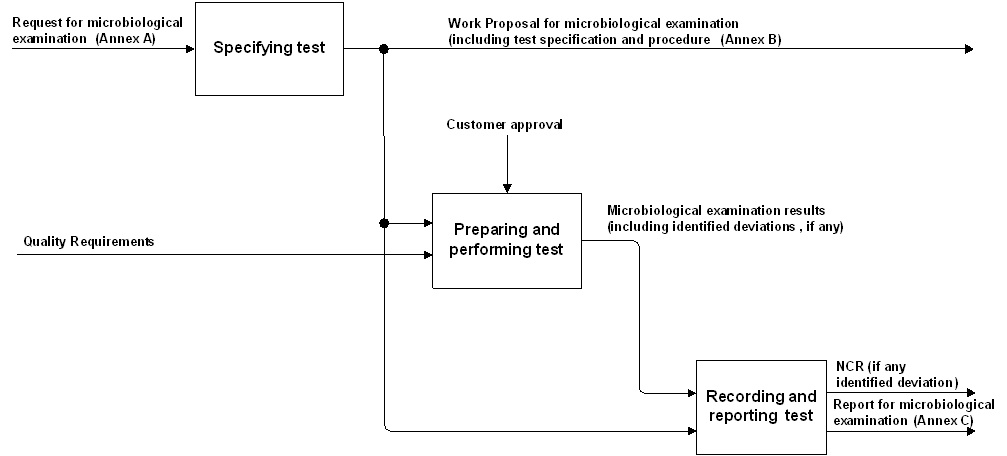 Figure 41: Microbiological examination process overview
Clause 5.1 provides the test specification.
Clause 5.2 and 5.4 provide the requirements for preparing, performing, recording and reporting microbiological examination.
The methods for bioburden determination are used to obtain an indication of the overall bioburden, but not for a general assessment of all microorganisms present in a sample.
Requirements
Specifying test
General provision
The customer shall provide a request for microbiological examination in conformance with Annex A DRD.
ECSS-Q-ST-20 shall be made applicable in the request for microbiological examination.
ECSS-Q-ST-10-09 shall be made applicable in the request for microbiological examination.
For safety and security, the test centre shall comply with the “Safety and security” requirements of ECSS-Q-ST-20-07.
Examples of safety issues are hazard and health. Example of security issues is access control.
Cleanliness and contamination control requirements according to ECSS-Q-ST-70-01 shall be applied for space hardware.
The supplier shall provide a microbiological examination proposal in conformance with Annex B DRD.
- 1 Quality standards for microbiological laboratories should follow ISO 17025.
- 2 Additional specific requirements (e.g. avoidance of certain chemical functionalities) can be imposed by the mission objectives.
Specifying the test means
Facilities
The work area shall comply to the rules and guidelines of good laboratory practice.
The ambient conditions for the process and work areas shall be (22 ± 3) °C with a relative humidity of (55 ± 10) % unless otherwise stated.
Equipment, reagents and consumables
The supplier shall identify and specify the list of the equipment, reagents and consumables necessary to set up and run the approved test procedures.
If the test procedures proposed in Annex D - Annex G are executed by the supplier, the corresponding equipment, reagents and consumables specification is described therein.
Specifying the test procedure
Test procedures
Surfaces with an area of maximal 25 cm2 shall be sampled with swabs and surfaces with an area of maximal 1 m2 shall be sampled with wipes.
Multiple swabs and wipes can be used to sample a larger surface area.
Bioburden shall be determined with assays for quantification of aerobic mesophilic bacteria.
- 1 Example procedures are given in Annex D.1, D.2., E.1 and E.2.
- 2 This sampling is only appropriate for materials and material combinations (e.g. electrochemical compatibility, see ECSS-Q-ST-70-71) that can tolerate sample collection using damp materials.
Biodiversity shall be determined with assays for determination of the type of micro-organism. - 1 Example procedures are given in Annexe D.2 to D.5 (swabs) and Annexes E.2 to E.5 (wipes).
- 2 In addition, non-culture-based methods are used for the molecular analysis of non-cultivable microorganisms with example procedures in Annex D.6 (swab) and Annex E.6.1 (wipe).
- 3 This sampling is only appropriate for materials and material combinations (e.g. electrochemical compatibility, see ECSS-Q-ST-70-71) that can tolerate sample collection using damp materials.
- 4 For cleanroom control also contact plates and active air samplers can be applied with example procedures in Annex F (contact plates) and Annex G (active air sampling).
Air sampling shall be applied for continuous clean room monitoring.
Validation
The test procedures shall be validated in accordance to customer requirements or specifications.
This validation can include the determination of relative or absolute efficiencies of the sampling and analysis method to establish a correction factor for the absolute bioburden numbers.
Preparing and performing the microbiological examination
General
The microbiological examination proposal shall be provided for customer approval.
The test proposal shall include the procedures.
ECSS-Q-ST-20 shall apply for the establishment of the test procedures.
Preparing microbiological assays
Identification
Locations where microbiological assays are taken shall be clearly identified with appropriate details to maintain traceability.
For example, microbiological assay plan.
Assays shall be identified as a minimum by:
- Date and time
- Operator(s)
- Reference to trace location of assay
- Type of assay
- Area of the assay or air volume taken
- Storage conditions of assay sample.
Preparation, handling and storage of reagents and consumables
Rules and guidelines of good laboratory practice shall be followed.
Performing microbiological assays
The supplier shall perform the approved microbiological examination procedures in conformance with Annex B DRD.
- 1 Examples of approved microbiological assay procedures are given in Annex D - Annex G.
- 2 Sterile operations and sample processing are performed in laminar flow environment according to ISO 5 particulate cleanliness level defined in ISO 14644-1.
Personnel
Personnel conducting microbiological examination of flight hardware and cleanrooms shall be trained in microbiology.
Guidance on training can be found in ISO 14698 part 1, Annex G.
Recording and reporting the test results
Test records
The test records of the microbiological examination shall be retained for, at least, ten years or in accordance with customer requirements.
The quality records shall contain as a minimum the following:
- Date and time of the assay campaign
- Operator(s)
- Type of assay and assay procedure
- Traceable details about assay
For example, location, area, air volume.
- Storage conditions of assay sample
For example, temperature after sampling at packaging, transport time, temperature at start of assay.
- Details of the equipment used for the assay
- Comments concerning any unusual occurrence during sampling, transport or assay
- Reports of the microbiological examination results
Depending on customer requirements the calculation of the bioburden can include a correction factor (see 5.2).
The test records of the microbiological examination shall be composed of:
- the request for microbiological examination in conformance with Annex A DRD,
- the microbiological examination proposal in conformance with Annex B DRD,
- the microbiological examination report in conformance with Annex C DRD,
- a conclusion with respect to the compliance with the project requirements (acceptance criteria) and associated non-conformances.
Test report
The supplier provide a test report in conformance with the DRD in Annex C and the requirements on “Test reports” of ECSS-Q-ST-20.
The supplier shall submit the test report to the customer for approval.
Acceptance criteria and nonconformance
Acceptance criteria shall be defined (beforehand) in common agreement between the test authority and the customer.
Any suspected or actual equipment failure shall be recorded as project non conformance report so that previous results may be examined to ascertain whether or not re-inspection and re-testing.
The test procedures shall contain an instantiation or adaptation for the test item of the non conformance processing flow chart as described in ECSS-Q-ST-10-09.
In the frame of research and development activities, this is not necessary.
The supplier shall notify the customer of the non conformance details.
Traceability shall be maintained throughout the process from incoming inspection to final measurements and calculations, including details of the test equipment and personnel employed in performing the task.
Evaluation of other properties may be invoked by the customer.
ANNEX(normative)Request for microbiological examination - DRD
DRD identification
Requirement identification and source document
This DRD is called from ECSS-Q-ST-70-55, requirement 5.1.1a.
Purpose and objective
The purpose of the request is the quantitative and/or qualitative microbiological examination of surfaces of flight hardware and in microbiological controlled environments (e.g. cleanroom surfaces, cleanroom air, isolator systems).
Expected response
Scope and content
The Request for microbiological examination shall include or refer to the following information:
- Objective of the test activity.
- Background and justification to the test activity.
- Identification of flight hardware or cleanroom facilities to be investigated (including state of controlled environment at rest and operation).
- Description of test activity.
- Deliverables.
- Applied quality standards for microbiological laboratory.
Special remarks
None.
ANNEX(normative)Microbiological examination test specifications and procedures (Work Proposal) - DRD
DRD identification
Requirement identification and source document
This DRD is called from ECSS-Q-ST-70-55, requirement.5.1.1f.
Purpose and objective
The work proposal is a document that specifies the test activity for the microbiological examination. The work proposal is prepared by the supplier who is responsible for the test activity, and it is submitted to the customer for review and approval.
Expected response
Scope and content
The WP shall include or refer to the following information:
- A proposed work description giving:
- the objectives of the test activity,
- applied quality standards for microbiological laboratory,
- test procedure and reference to standards (this includes sources),
- identification of flight hardware or cleanroom facilities (including state of controlled environment at rest and operation),
- test conditions, including environment, properties evaluated and measurement techniques,
- expected test output,
- validation protocol.
- A proposed settlement describing the test procedures and any deviation from the conditions initially requested by the customer.
- A financial and administrative proposal including:
- responsible person for the activity,
- list of deliverable items,
- work breakdown structure defining the required operations (which include. preparation of specimens, testing, evaluation of results, reporting) and responsibilities,
- time schedule,
- itemized cost list.
Special remarks
None.
ANNEX(normative)Microbiological examination test report - DRD
DRD identification
Requirement identification and source document
This DRD is called from ECSS-Q-ST-70-55, requirement 5.4.2a.
Purpose and objective
The purpose of the microbiological examination test report is to provide quantitative and/or qualitative evidence of microbiological contamination on sampled surfaces or in cleanroom air.
Expected response
Scope and content
The microbiological examination test report shall include or refer to the following information:
- Description of the purpose, objective, content and the reason prompting its preparation.
- Description of the sampled flight hardware or microbiologically controlled environment or a reference to the document containing its identification characteristics.
For example, request for microbiological examination DRD.,
- Applied quality standards for microbiological laboratory.
- Validation protocol.
- Calibration tools.
- The microbiological assay procedures or a reference to the document containing the description of the test procedure.
For example, microbiological assay specifications and procedures DRD. It often consist in describing the as- run test procedure as well as any deviation from the initial test procedure (including a discussion of possible effect on test
- The test results.
- Statistical analysis.
- Discussion about the test results.
- Conclusion and recommendations.
Special remarks
None.
ANNEX(informative)Procedures for swab assays
Swab assay 1 (standard swab assay)
General
With this assay mesophilic aerobic spores and bacteria that are able to survive a heat treatment for 15 min at 80 °C are determined. The flow-chart for the swab assay 1 is schematically shown in Figure D-1.
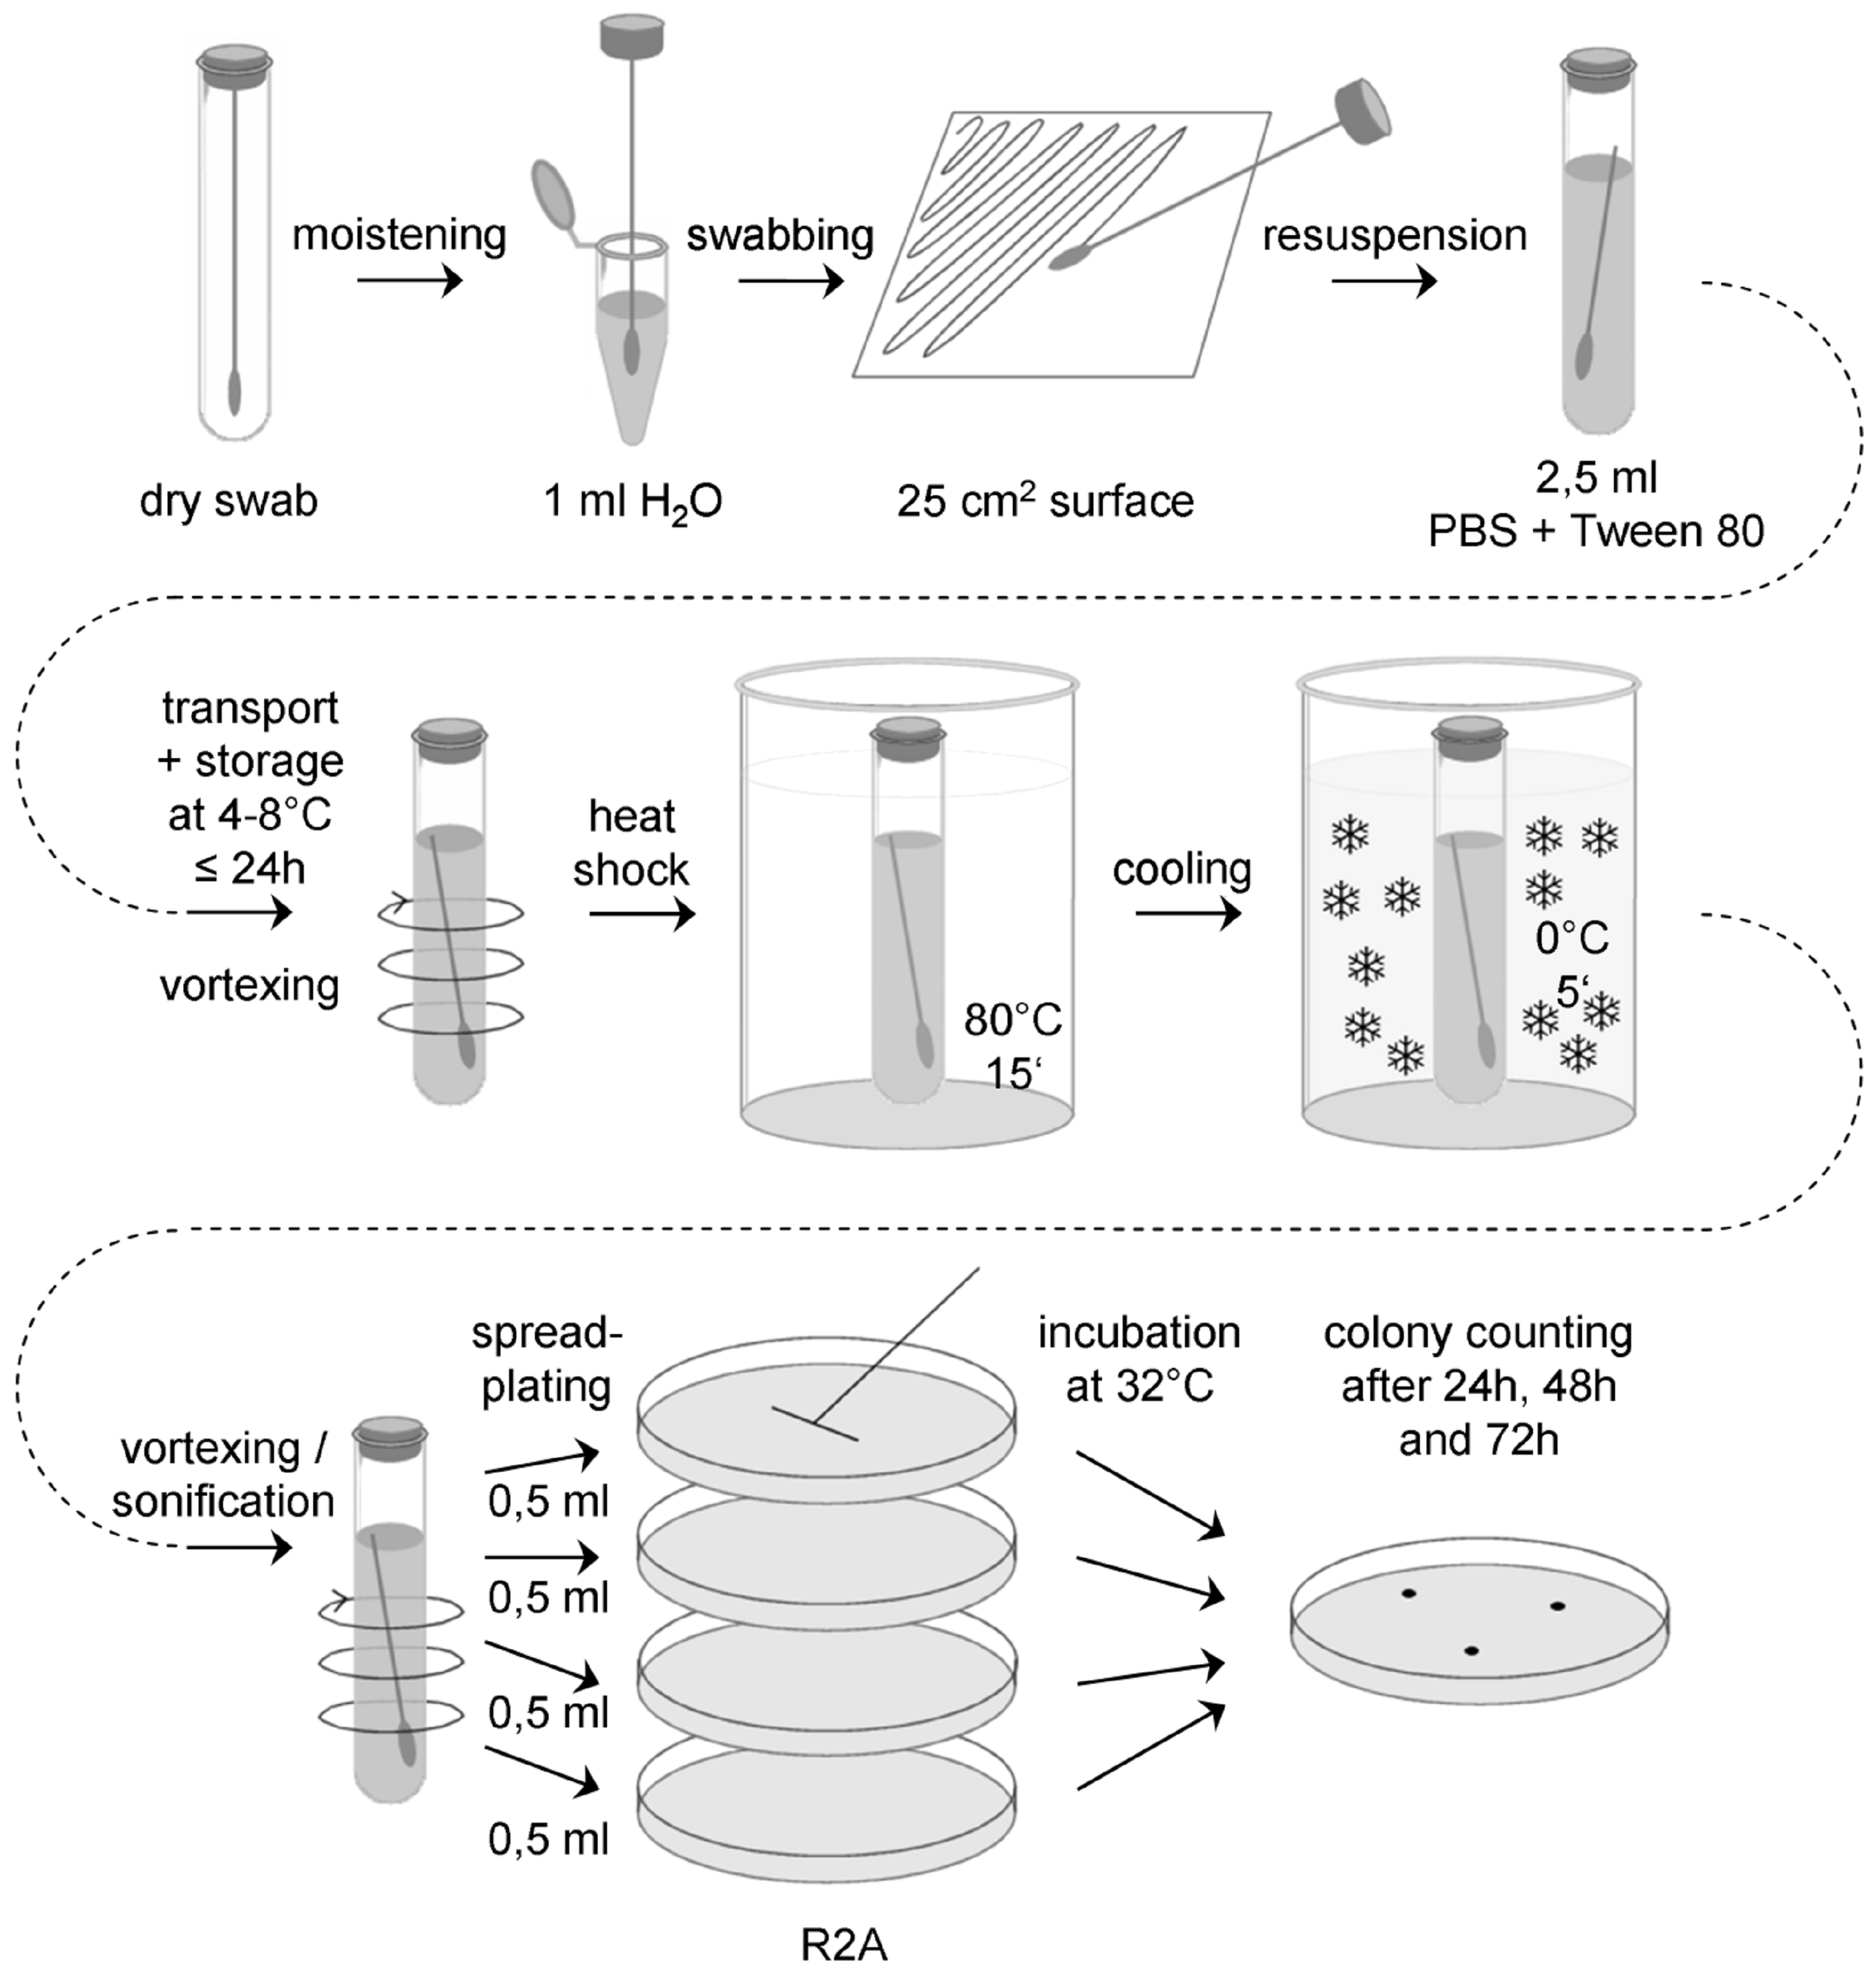 Figure: Flow chart for the standard swab assay (swab assay 1)
Sample collection
Prepare a sufficient number of sterile swabs and test tubes with sterile water, ASTM type IIB (ASTM D 1193), for all swab samples to be collected, plus controls. Aseptically remove a sterile swab from its container and moisten the head of the swab in a test tube with sterile water, ASTM type IIB. Express excess moisture from the swab against the interior wall of the tube.
Hold the swab so that the handle makes about a 30° angle with the surface to be sampled. While moving the swab in one direction, rotate the head of the swab slowly and thoroughly over a measured 25 cm2 surface area. Change the linear direction of the swabbing motion 90° and again swab the surface thoroughly. Complete a third coverage of the surface by again changing the direction of the swabbing motion by 135°.
Return the swab head to a tube containing 2,5 ml sterile buffer (PBS + 0,02 v/v % Tween 80, pH 7,2) by breaking the swab shaft at the breakpoint.
Transport and storage
Transport samples to the laboratory and store at (4 – 8) °C and process within 24 hours.
Extraction
Place each tube containing the buffer and the swab on a vortex mixer and vortex at maximum power for 5 - 6 seconds.
Sonification can be required depending on the swap type used.
Heat shock
Place the tube containing the vortexed suspension and the swab in a water bath at (80 ± 2) °C for 15 minutes, as determined by a pilot tube containing a thermometer. Make certain the water bath level is above the level of the liquid content of each tube being heated.
After heat shock, cool the tubes rapidly to bring the contents to (30 – 35) °C. If the entire plating procedure last more than 10 minutes, the heat shocked tubes should be placed in an ice bath for no longer than 45 minutes prior to plating.
Plating
Vortex swab extraction suspension for 5 – 6 seconds and aseptically pipette 0,5 ml aliquots of the swab extraction suspension onto the surface of R2A Petri plates, using 2 ml total.
Use a sterile spreader to spread the dilution over the surface as evenly as possible. Allow the moisture to be absorbed into the agar before incubation.
Incubation
Plates should be incubated inverted at (32 ± 1) °C.
Counting
Examine the sample plates at 24 and 48 hours. If colonies visible by eyes are observed, count and record data. Examine and record final colony counts at 72 hours. Do not remove the Petri plate covers until the final 72 hour count is made.
Controls
For each ten or fewer samples collected, also collect a 'field negative’ control, at least 3 per day. Remove the sterile swab from its container, moisten with sterile water, ASTM type IIB, as above, wave the swab through the air for 2 to 4 seconds, and return the swab to a tube containing sterile buffer.
In the lab, create at least two ‘lab negative controls’ by moistening the head of a sterile swab in sterile water, as above, and return the swab to the tube containing sterile buffer without exposing it to air.
Analyse the controls in the same way as the samples described above.
Equipment, reagents and consumable materials
Dry sterile swabs
Tubes with sterile water, ASTM type IIB, for moistening of swabs
Tubes with 2,5 ml sterile buffer (PBS + 0,02 v/v % Tween 80, pH 7,2)
Refrigerator (4 – 8) °C
Cool box
Vortex mixer
Water bath (80 ± 2) °C
Ice bath
Thermometer
Microliter pipette and sterile tips
Laminar flow hood
Sterile spreaders
R2A Petri plates (90 mm)
Incubator (32 ± 1) °C
Swab assay 2
General
With this assay aerobic mesophiles are determined. The flow-chart for the swab assay 2 is schematically shown in Figure D-2.
 Figure: Flow chart for swab assay 2
Sample collection
Prepare a sufficient number of sterile swabs and test tubes with sterile water, ASTM type IIB, for all swab samples to be collected, plus controls. Aseptically remove a sterile swab from its container and moisten the head of the swab in a test tube with sterile water, ASTM type IIB. Express excess moisture from the swab against the interior wall of the tube.
Hold the swab so that the handle makes about a 30° angle with the surface to be sampled. While moving the swab in one direction, rotate the head of the swab slowly and thoroughly over a measured 25 cm2 surface area. Change the linear direction of the swabbing motion 90° and again swab the surface thoroughly. Complete a third coverage of the surface by again changing the direction of the swabbing motion by 135°.
Return the swab head to a tube containing 2,5 ml sterile buffer (PBS + 0,02 v/v % Tween 80, pH 7,2) by breaking the swab shaft at the breakpoint.
Transport and storage
Transport samples to the laboratory and store at (4 – 8) °C and process within 24 hours.
Extraction
Place each tube containing the buffer and the swab on a vortex mixer and vortex at maximum power for 5 - 6 seconds.
It is important not to perform a heat-shock!
Plating
Vortex swab extraction suspension for 5 – 6 seconds and aseptically pipette 0,5 ml aliquots of the swab extraction suspension onto the surface of R2A Petri plates, using 2 ml total.
Use a sterile spreader to spread the dilution over the surface as evenly as possible. Allow the moisture to be absorbed into the agar before incubation.
Incubation
Plates should be incubated inverted at (32 ± 1) °C.
Counting
Examine the sample plates at 24 and 48 hours. If colonies visible by eyes are observed, count and record data. Examine and record final colony counts at 72 hours. Do not remove the Petri plate covers until the final 72 hour count is made. Keeping photographic evidence for biodiversity determination can be helpful. If necessary, purify the colonies by streak outs before identification and archiving.
Controls
For each ten or fewer samples collected, also collect a 'field negative’ control, at least 3 per day. Remove the sterile swab from its container, moisten with sterile water, ASTM type IIB, as above, wave the swab through the air for 2 to 4 seconds, and return the swab to a tube containing sterile buffer.
In the lab, create at least two ‘lab negative controls’ by moistening the head of a sterile swab in sterile water, as above, and return the swab to the tube containing sterile buffer without exposing it to air.
Analyse the controls in the same way as the samples described above.
Equipment, reagents and consumable materials
Dry sterile swabs
Tubes with sterile water, ASTM type IIB, for moistening of swabs
Tubes with 2,5 ml sterile buffer (PBS + 0,02 v/v % Tween 80, pH 7,2)
Refrigerator (4 – 8) °C
Cool box
Vortex mixer
Microliter pipette and sterile tips
Laminar flow hood
Sterile spreaders
R2A Petri plates (90 mm)
Incubator (32 ± 1) °C
Swab assay 3
General
With this assay aerobic psychrophiles / psychrotolerants are determined. The flow-chart for the swab assay 3 is schematically shown in Figure D-3.
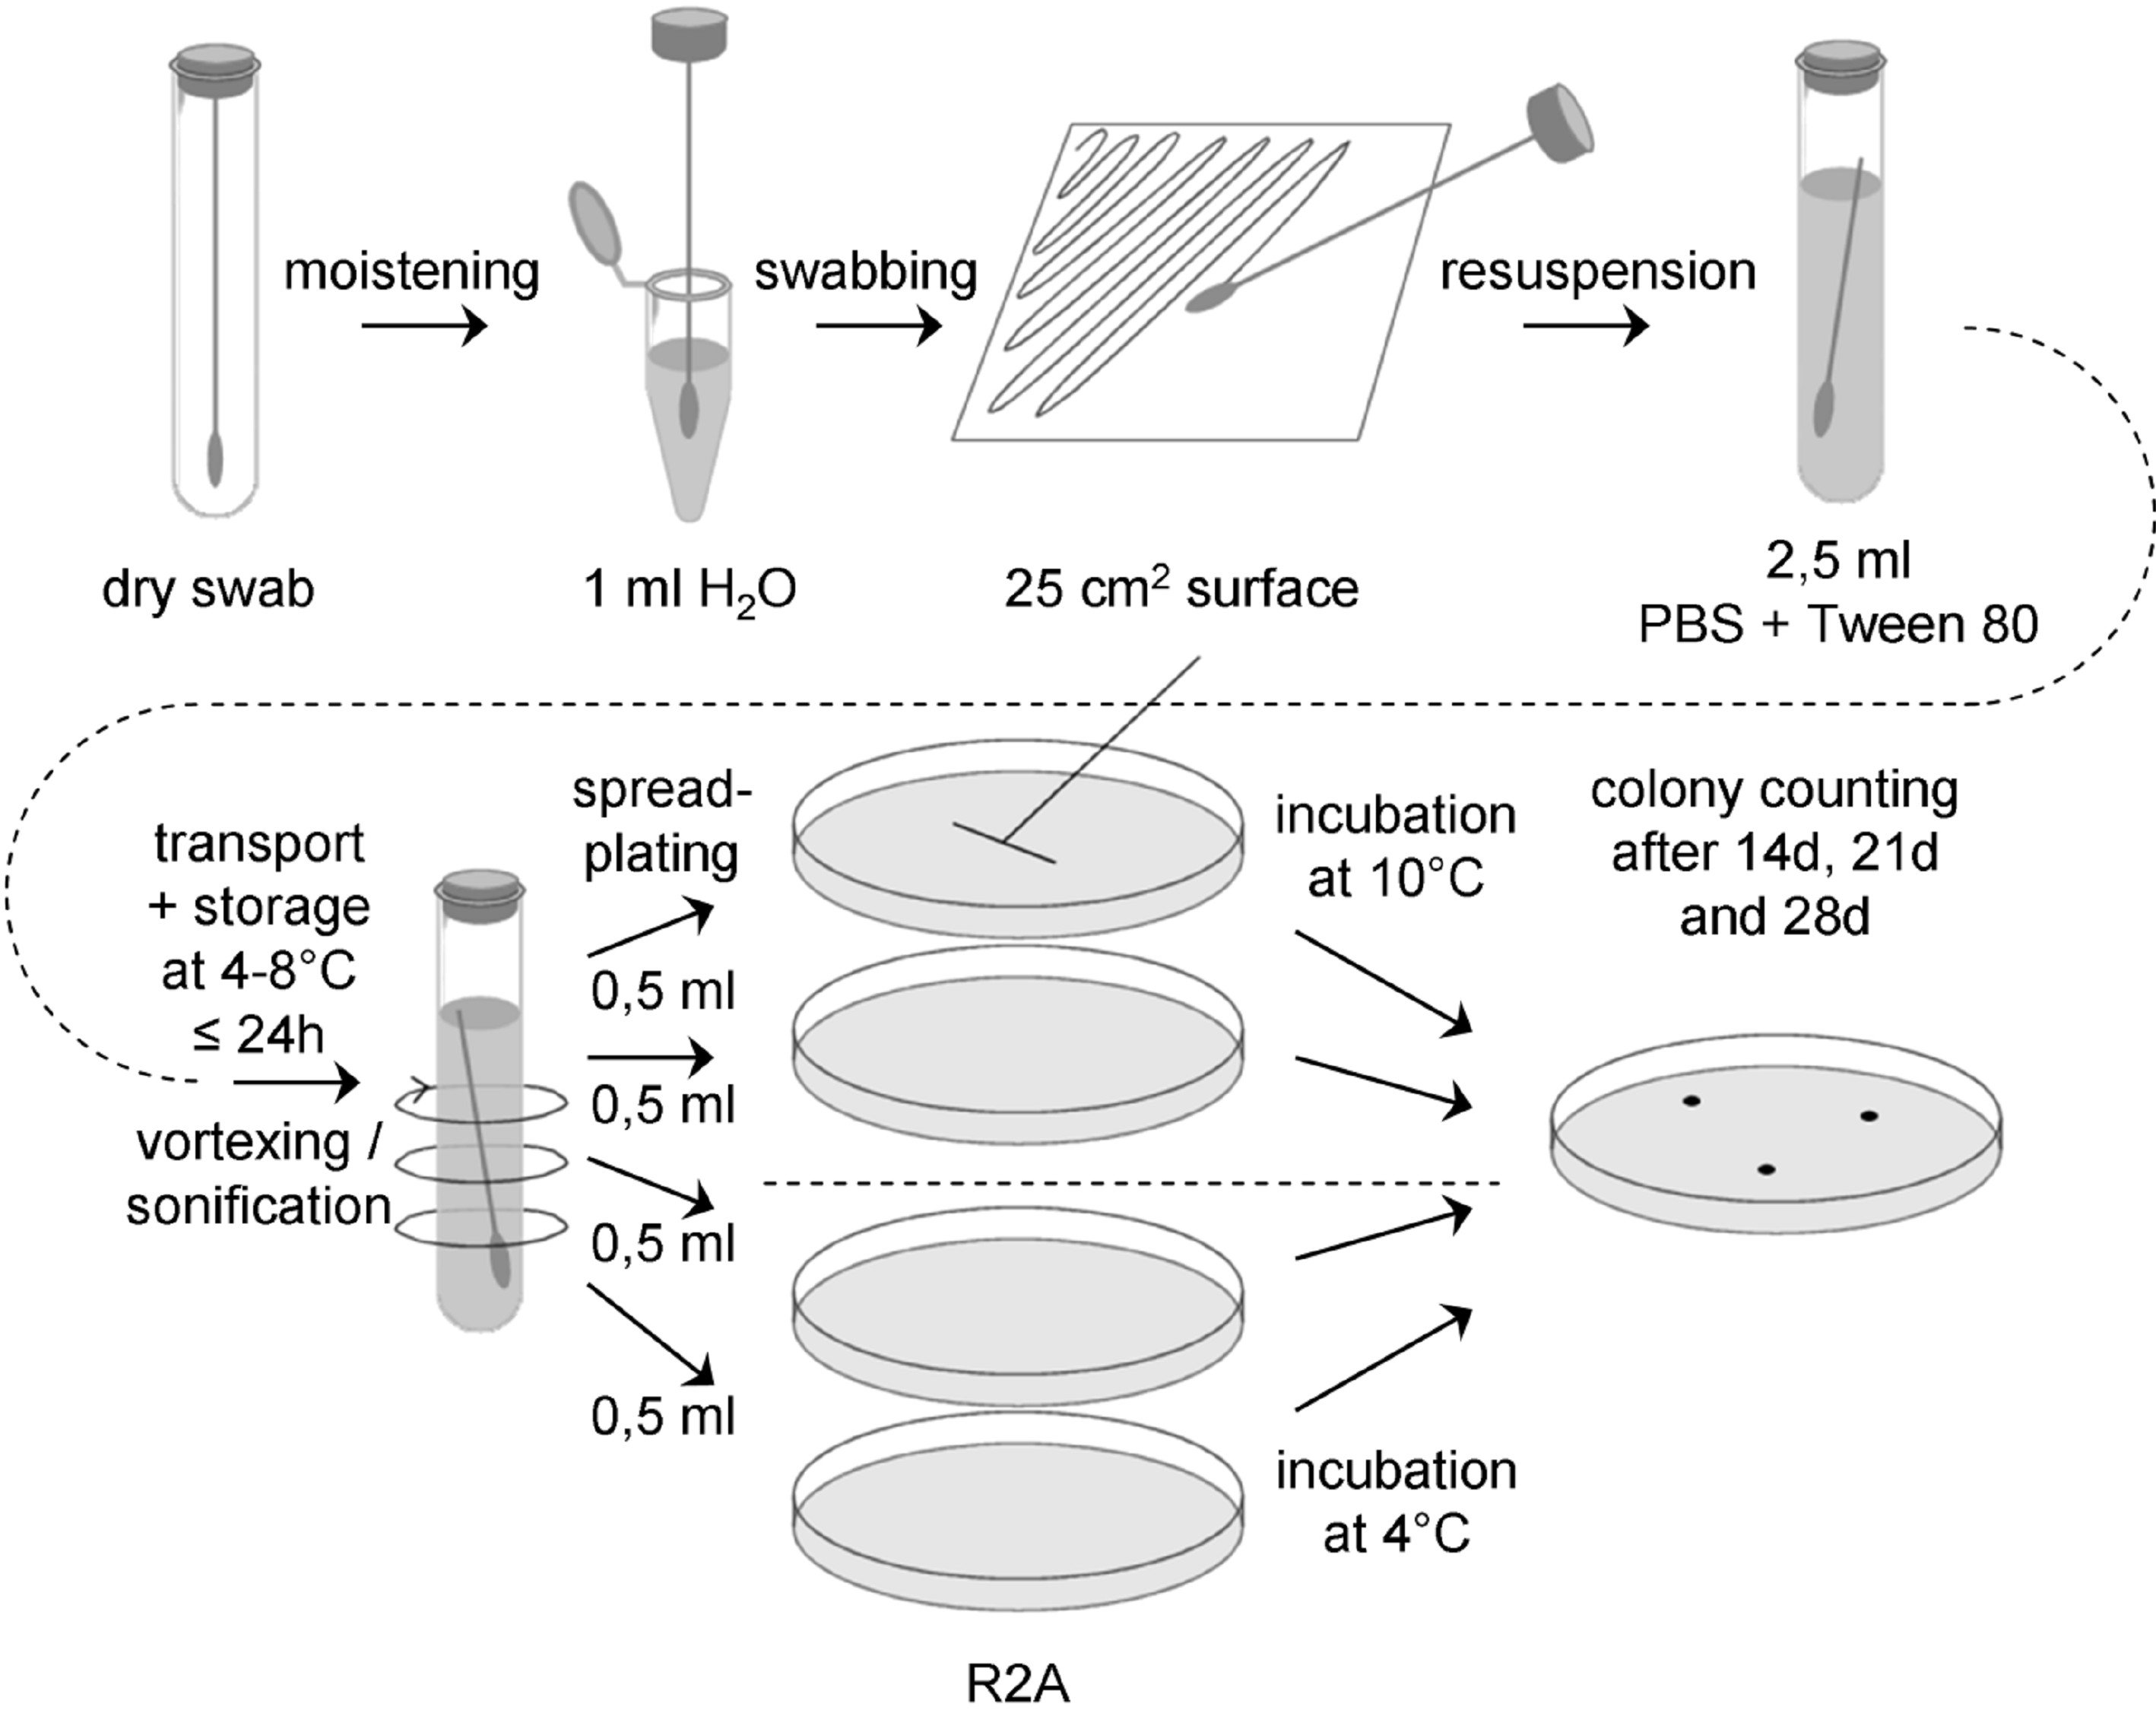 Figure: Flow chart for swab assay 3
Sample collection
Prepare a sufficient number of sterile swabs and test tubes with sterile water, ASTM type IIB, for all swab samples to be collected, plus controls. Aseptically remove a sterile swab from its container and moisten the head of the swab in a test tube with sterile water, ASTM type IIB. Express excess moisture from the swab against the interior wall of the tube.
Hold the swab so that the handle makes about a 30° angle with the surface to be sampled. While moving the swab in one direction, rotate the head of the swab slowly and thoroughly over a measured 25 cm2 surface area. Change the linear direction of the swabbing motion 90° and again swab the surface thoroughly. Complete a third coverage of the surface by again changing the direction of the swabbing motion by 135°.
Return the swab head to a tube containing 2,5 ml sterile buffer (PBS + 0,02 v/v % Tween 80, pH 7,2) by breaking the swab shaft at the breakpoint.
Transport and storage
Transport samples to the laboratory and store at (4 – 8) °C and process within 24 hours.
Extraction
Place each tube containing the buffer and the swab on a vortex mixer and vortex at maximum power for 5 - 6 seconds.
It is important not to perform a heat-shock!
Plating
Vortex swab extraction suspension for 5 – 6 seconds and aseptically pipette 0,5 ml aliquots of the swab extraction suspension onto the surface of R2A Petri plates, using 2 ml total.
Use a sterile spreader to spread the dilution over the surface as evenly as possible. Allow the moisture to be absorbed into the agar before incubation.
Incubation
Two plates should be incubated inverted at (10 ± 1) °C, the other two at (4 ± 1) °C.
Counting
Examine the sample plates at 14 and 21 days. If colonies visible by eyes are observed, count and record data. Examine and record final colony counts at 28 days. Do not remove the Petri plate covers until the final 28 days count is made. Keeping photographic evidence for biodiversity determination can be helpful. If necessary, purify the colonies by streak outs before identification and archiving.
Controls
For each ten or fewer samples collected, also collect a 'field negative’ control, at least 3 per day. Remove the sterile swab from its container, moisten with sterile water, ASTM type IIB, as above, wave the swab through the air for 2 to 4 seconds, and return the swab to a tube containing sterile buffer.
In the lab, create at least two ‘lab negative controls’ by moistening the head of a sterile swab in sterile water, as above, and return the swab to the tube containing sterile buffer without exposing it to air.
Analyse the controls in the same way as the samples described above.
Equipment, reagents and consumable materials
Dry sterile swabs
Tubes with sterile water, ASTM type IIB, for moistening of swabs
Tubes with 2,5 ml sterile buffer (PBS + 0,02 v/v % Tween 80, pH 7,2)
Refrigerator (4 – 8) °C
Cool box
Vortex mixer
Microliter pipette and sterile tips
Laminar flow hood
Sterile spreaders
R2A Petri plates (90 mm)
Incubator (10 ± 1) °C
Incubator (4 ± 1) °C
Swab assay 4
General
With this assay aerobic mesophilic fungi, that is yeasts and molds, are determined. The flow chart for the swab assay 4 is schematically shown in Figure D-4.
 Figure: Flow chart for swab assay 4
Sample collection
Prepare a sufficient number of sterile swabs and test tubes with sterile water, ASTM type IIB, for all swab samples to be collected, plus controls. Aseptically remove a sterile swab from its container and moisten the head of the swab in a test tube with sterile water, ASTM type IIB. Express excess moisture from the swab against the interior wall of the tube.
Hold the swab so that the handle makes about a 30° angle with the surface to be sampled. While moving the swab in one direction, rotate the head of the swab slowly and thoroughly over a measured 25 cm2 surface area. Change the linear direction of the swabbing motion 90° and again swab the surface thoroughly. Complete a third coverage of the surface by again changing the direction of the swabbing motion by 135°.
Return the swab head to a tube containing 2,5 ml sterile buffer (PBS + 0,02 v/v % Tween 80, pH 7,2) by breaking the swab shaft at the breakpoint.
Transport and storage
Transport samples to the laboratory and store at (4 – 8) °C and process within 24 hours.
Extraction
Place each tube containing the buffer and the swab on a vortex mixer and vortex at maximum power for 5 - 6 seconds.
It is important not to perform a heat-shock.
Plating
Vortex swab extraction suspension for 5 – 6 seconds and aseptically pipette 0,5 ml aliquots of the swab extraction suspension onto the surface of PDA agar plates, using 2 ml total.
Use a sterile spreader to spread the dilution over the surface as evenly as possible. Allow the moisture to be absorbed into the agar before incubation.
Incubation
Plates should be incubated inverted at (25 ± 1) °C.
Counting
Examine the sample plates at 3, 5 and 7 days. If colonies visible by eyes are observed, count and record data. If necessary, purify the colonies by streak outs before identification and archiving. Keeping photographic evidence for biodiversity determination can be helpful.
Controls
For each ten or fewer samples collected, also collect a 'field negative’ control, at least 3 per day. Remove the sterile swab from its container, moisten with sterile water, ASTM type IIB, as above, wave the swab through the air for 2 to 4 seconds, and return the swab to a tube containing sterile buffer.
In the lab, create at least two ‘lab negative controls’ by moistening the head of a sterile swab in sterile water, as above, and return the swab to the tube containing sterile buffer without exposing it to air.
Analyse the controls in the same way as the samples described above.
Equipment, reagents and consumable materials
Dry sterile swabs
Tubes with sterile water, ASTM type IIB, for moistening of swabs
Tubes with 2,5 ml sterile buffer (PBS + 0,02 v/v % Tween 80, pH 7,2)
Refrigerator (4 – 8) °C
Cool box
Vortex mixer
Microliter pipette and sterile tips
Laminar flow hood
Sterile spreaders
PDA Petri plates (90 mm)
Incubator (25 ± 1) °C
Swab assay 5
General
With this assay anaerobic mesophiles are determined. The flow chart for the swab assay 5 is schematically shown in Figure D-5.
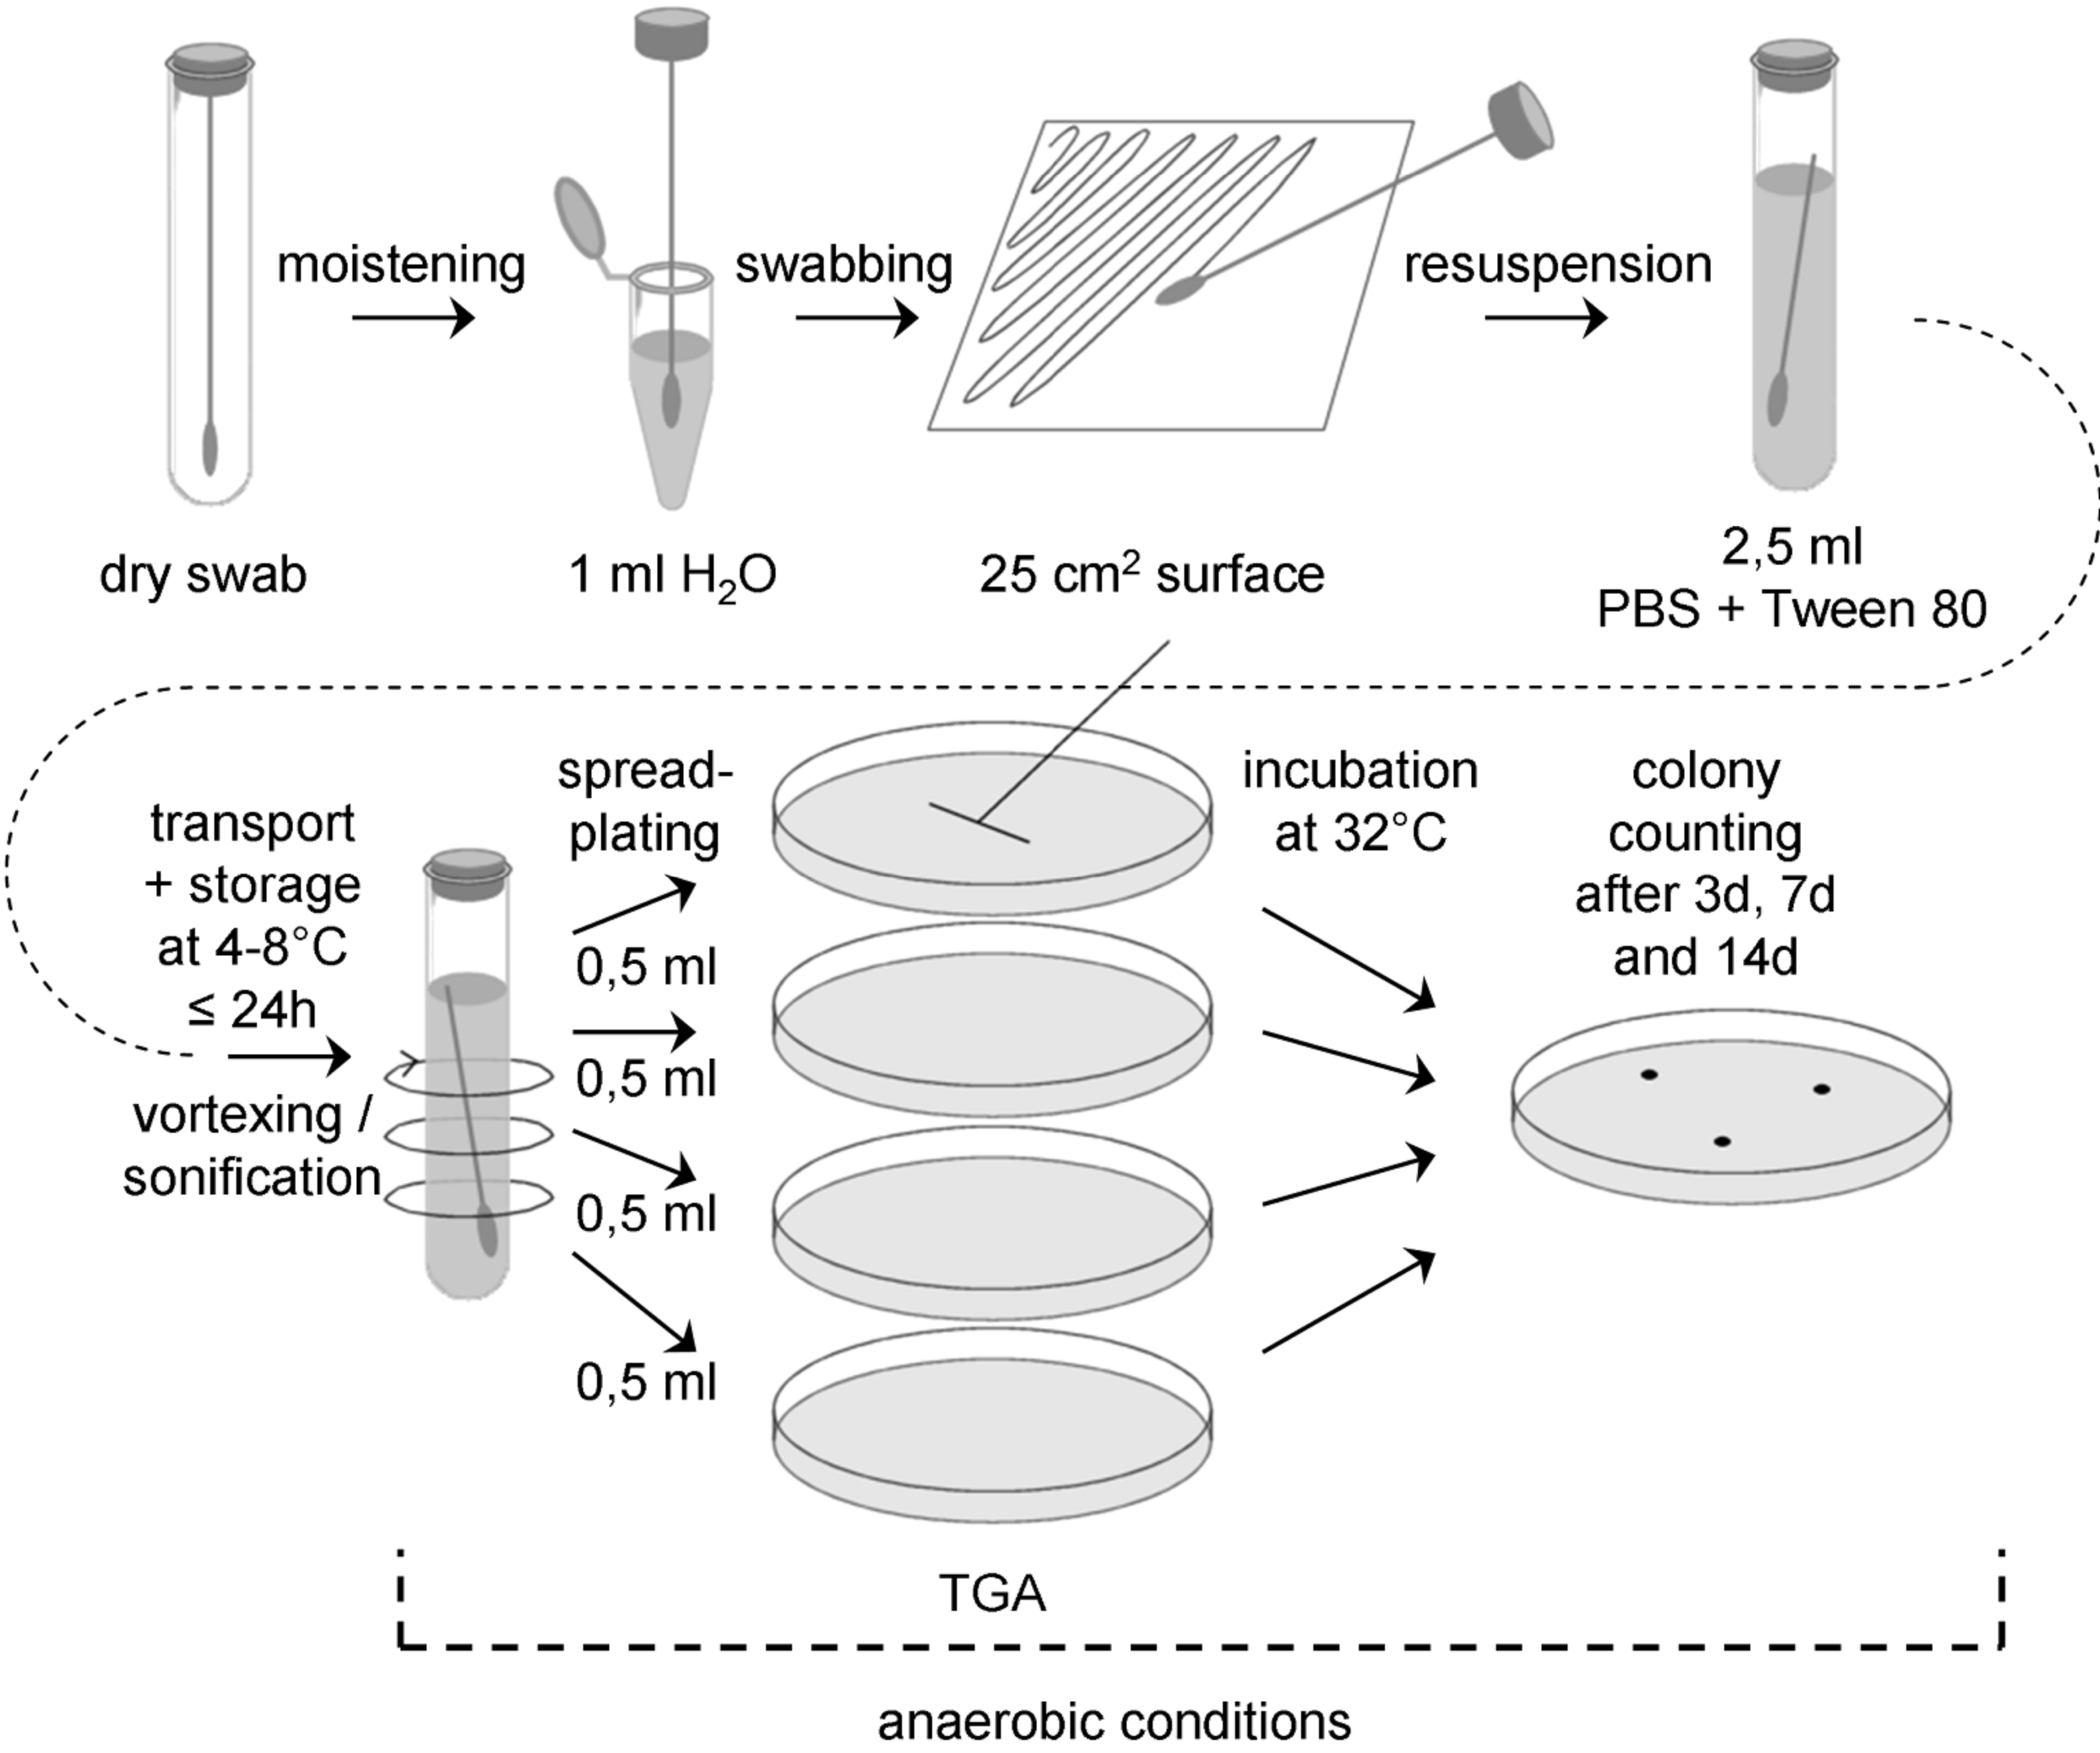 Figure: Flow chart for swab assay 5 (anaerobic conditions from resuspension onwards)
Sample collection
Before sampling, prepare a sufficient number of tubes with anaerobic buffer (PBS + 0,02 v/v % Tween 80). Add sodium resazurin (0,001 g/l) as redox indicator. Bubble buffer with nitrogen. Reduce PBS by adding 0,5 g/l sodium sulfide x 9 H2O. Adjust pH to 7,2 using disposable syringes and hypodermic needles. Redox indicator should turn colourless. Under anaerobic conditions (anaerobic chamber), prepare 10 ml aliquots in glass tubes with serum bottle necks, seal with butyl rubber stoppers and clamp. Add nitrogen gas phase three times by flushing and applying vacuum alternately. After the last nitrogen filling autoclave the solution.
Before sampling, prepare also a mixture of cystein-HCl and sodium sulfide as follows: Dissolve 0,5 g cystein-HCl and 0,5 g Na2S x 9 H2O in 10 ml of distilled water. Adjust pH to 7. Exchange the air against nitrogen and autoclave.
Prepare a sufficient number of sterile swabs and test tubes with sterile water, ASTM type IIB, for all swab samples to be collected, plus controls.
Directly before sampling, degass the tube with the anaerobic buffer by puncturing the rubber stopper with a sterile hypodermic needle and remove clamp of a tube.
Aseptically remove a sterile swab from its container and moisten the head of the swab in a test tube with sterile water, ASTM type IIB. Express excess moisture from the swab against the interior wall of the tube.
Hold the swab so that the handle makes about a 30° angle with the surface to be sampled. While moving the swab in one direction, rotate the head of the swab slowly and thoroughly over a measured 25 cm2 surface area. Change the linear direction of the swabbing motion 90° and again swab the surface thoroughly. Complete a third coverage of the surface by again changing the direction of the swabbing motion by 135°.
Remove stopper from anaerobic tube, drob swab into PBS by breaking the swab shaft at the breakpoint, close tube immediately with a new sterile stopper. If the redox indicator turns red, reduce tube content by adding 0,1 ml of a mixture of cystein-HCl and sodium sulfide by using a sterile disposable syringe and a sterile hypodermic needle. Increase the concentration of reducing agents stepwise (0,1 ml), if redox indicator does not turn colourless after a certain time.
Transport and storage
Transport samples to the laboratory and store at (4 – 8) °C and process within 24 hours.
Extraction
Place each tube containing the buffer and the swab on a vortex mixer and vortex at maximum power for 5 - 6 seconds.
It is important not to perform a heat-shock.
Plating
Perform plating under anaerobic conditions. Vortex swab extraction suspension for 5 – 6 seconds and aseptically pipette 0,5 ml aliquots of the swab extraction suspension onto the surface of TG agar plates, using 2 ml total.
Use a sterile spreader to spread the dilution over the surface as evenly as possible. Allow the moisture to be absorbed into the agar before incubation.
Incubation
Plates should be incubated inverted at (32 ± 1) °C under anaerobic conditions.
Counting
Examine the sample plates at 3 days, 7 days and 14 days. If colonies visible by eyes are observed, count and record data. If necessary, replate the colonies under anaerobic conditions before identification and archiving. Keeping photographic evidence for biodiversity determination can be helpful.
Controls
For each ten or fewer samples collected, also collect a 'field negative’ control, at least 3 per day. Remove the sterile swab from its container, moisten with sterile water, ASTM type IIB, as above, wave the swab through the air for 2 to 4 seconds, and return the swab to a tube containing sterile buffer.
In the lab, create at least two ‘lab negative controls’ by moistening the head of a sterile swab in sterile water, as above, and return the swab to the tube containing sterile buffer without exposing it to air.
Analyse the controls in the same way as the samples described above.
Equipment, reagents and consumable materials
General equipment for the cultivation of anaerobic microorganisms (e.g. gas station, glove box)
Dry sterile swabs
Tubes with sterile water, ASTM type IIB, for moistening of swabs
Tubes with 10 ml anaerobic sterile buffer (PBS + 0,02 v/v % Tween 80, pH 7,2)
Tube with a mixture of cystein-HCl and sodium sulfide
Hypodermic needles and syringes
Crimper/ Decrimper
Sterile stoppers
Cool box
Refrigerator (4 – 8) °C
Vortex mixer
Microliter pipette and sterile tips
Sterile spreaders
TG agar plates (90 mm)
Anaerobic jar
Incubator (32 ± 1) °C
Swab assay 6
General
With this assay DNA is extracted from swabs for molecular biodiversity determination, which also includes the identification of non-cultivable microorganisms (Bacteria, Archaea and Fungi). After the DNA extraction the 16S/18S rRNA gene is amplified, cloned and sequenced. For all steps sterile DNAse- and RNAse-free ultrapure water (ASTM type I, see ASTM D 1193) should used.
Methods for taxonomic allocation deduced by sequence comparison with public 16S/18S rRNA gene data bases are not part of this standard.
Sample collection
Prepare a sufficient number of sterile swabs and test tubes with sterile DNAse- and RNAse-free ultrapure water for all swab samples to be collected, plus controls. Aseptically remove a sterile swab from its container and moisten the head of the swab in a test tube with sterile DNAse- and RNAse-free ultrapure water. Express excess moisture from the swab against the interior wall of the tube.
Hold the swab so that the handle makes about a 30° angle with the surface to be sampled. While moving the swab in one direction, rotate the head of the swab slowly and thoroughly over a measured 25 cm2 surface area. Change the linear direction of the swabbing motion 90° and again swab the surface thoroughly. Complete a third coverage of the surface by again changing the direction of the swabbing motion by 135°.
Return the swab to a tube containing 2,0 ml sterile DNAse- and RNAse-free ultrapure water by breaking the swab shaft at the breakpoint.
Transport and storage
Transport samples to the laboratory and store at (4 – 8) °C and process within 24 hours.
Extraction
Place each tube containing the buffer and the swab on a vortex mixer and vortex at maximum power for 5 - 6 seconds.
Starting with 1 ml sample add 1 ml of 2 x XS buffer (20 ml stock solution: 4 ml 1 M Tris/HCl, pH 7,4; 4,56 ml 7 M ammonium acetate; 3,2 ml 250 mM EDTA; 4 ml 10% (w/v) SDS); 0,4 g potassium ethyl xanthogenate; 4,99 ml sterile DNAse- and RNAse-free ultrapure water (ASTM type I); prepare 2x XS buffer freshly every time). Mix sample gently (short vortex). Incubate 2 h at 65 °C (90 °C for fungi), mixing by hand about every 30 minutes. Vortex for 10 sec after incubation. Place tube on ice for 10 minutes. Centrifuge (1000 rpm, 5 min, 4 °C), discard pellet. Add same volume of phenol:chloroform-isoamylalcohol (25:24:1), mix gently and centrifuge (5000 rpm, 5 min, 15 °C). Transfer (upper) aqueous layer into a new tube. To precipitate DNA add same volume of cold 100% isopropanol and 1/10 volume of 4 M potassium acetate. Mix gently. Incubate at –20 °C over night. Centrifuge (13000 rpm, 30 min, 4 °C). Wash pellet with 1 ml 70% ethanol (ice cold) and centrifuge (13000 rpm, 30 min, 4 °C). Dry pellet and dissolve it in 15 µl sterile DNAse- and RNAse-free ultrapure water (ASTM type I).
The usage of a PhaseLock Gel tube is recommended.
DNA amplification by PCR
The following primers should be used for amplification of 16 S rRNA gene from Archaea and Bacteria and 18S rRNA gene from fungi are shown in Table D-1.
Table: Primers for amplification of 16S rDNA from Archaea, Bacteria and Fungi
|
Target
|
Forward (5’ – 3’)
|
Reverse (5’ – 3’)
|
Reference
|
|
Archaea
|
345afCGGGGYGCASCAGGCGCGAA
|
1406uRACGGGCGGTGTGTRCAA
|
Burggraf et al., 1997; Lane, 1991
|
|
Bacteria
|
9bfGRGTTTGATCCTGGCTCAG
|
1406uRACGGGCGGTGTGTRCAA
|
Burggraf et al., 1992; Lane, 1991
|
|
Fungi
|
EF4F GGAAGGG[G/A]TGTATTTATTAG
|
EF3R TCCTCTAAATGACCAAGTTTG
|
Smit et al., 1999
|
PCR conditions
The following notes should be taken into account for the PCR conditions
Note 1: Usage of LowDNA-Taq or PfU Taq for bacterial PCR is recommended.
Note 2: The preparation of the PCR mixtures under sterile conditions (sterile hood), using aerosol filter pipette tips, is strongly recommended for environmental samples.
Note 3: For each primer combination a negative control (water instead of DNA) and a positive control is recommended.
Note 4: Hotstart- PCR is recommended.
For a 20 µl PCR assay the following composition is recommended: PCR buffer, incl. MgCl2 (10x): 2 µl; nucleotide mix (10 mM each): 0,5 µl; F-primer (25 ng/µl): 1 µl; R-primer (25 ng/µl): 1µl; (LD)-Taq (5 U/µl): 0,125 µl; DNAse- and RNAse-free ultrapure water: 14,38 µl; template DNA (10 ng/µl): 1 µl. For the amplification of bacterial or archaeal 16S rRNA gene sequences, perform the following PCR cycles: 96 °C for 90 s; 10 cycles of 96 °C for 30 s, 60 °C for 30 s, and 72 °C for 1 min; 25 cycles of 94 °C for 20 s, 60 °C for 30 s, and 72 °C for 1 min and a final incubation at 72 °C for 10 min.
For the amplification of fungal 18S rRNA gene sequences, perform the following PCR cycles: 94 °C for 3 min; 40 cycles of 94 °C for 1 min, 48 °C for 1 min, and 72 °C for 3 min and a final incubation at 72 °C for 10 min.
After PCR, the length of the PCR product obtained should be checked on a agarose gel. The PCR product can now be used for sequencing reactions or cloning for environmental samples.
Cloning of PCR products
Cloning should be done according the manufacturer's recommendations, as given in the kit manual.
Screening of clones
The presence of inserts of the expected sizes should be analyzed by direct PCR screening of transformants without plasmid extraction.
Pick a small part of each colony, using tooth picks (sterile) and perform colony PCR with the plasmid-specific primers (streak the same tooth pick on a new agar plate for storage of the colony). Check the sizes of the inserts by electrophoresis (use 10 µl of PCR product). Subject the remaining PCR product to RFLP analysis, using the enzymes AluI, HhaI, HinfI and RsaI according manufacturer's recommendations. Select representative transformants on the basis of the 16S rRNA gene fingerprint pattern. Grow these in liquid medium and purify plasmids for sequencing reaction.
Controls
For each step of the method, appropriate controls are recommended. For DNA extraction, a field blank control, as well as a lab control and a water control should be performed.
Field blank controls
Expose wipe or swab to the air in the clean room during sampling (wave) and proceed with this control like with the samples
Lab control
Expose wipe or swab to the air in the lab laminar flow and proceed with this control like with the samples.
Water control
Instead of swab sample extract use sterile DNAse- and RNAse-free ultrapure water for DNA extraction.
For PCR use the three blanks mentioned above. Additionally use one PCR blank (water instead of sample). For PCR the usage of positive controls is also strongly recommended.
Analyse the controls in the same way as the samples described above.
Equipment, reagents and consumable materials
Dry sterile swabs
Tubes with sterile water, ASTM type I, for moistening of swabs
Tubes with 2 ml sterile water, ASTM type I
Cool box
Refrigerator (4 – 8) °C
Vortex mixer
2 ml tubes
2x XS buffer solution
Water bath (65 ± 2) °C or (90 ± 2) °C
Ice
Laboratory centrifuge
Phenol:chloroform:isoamylalcohol (25:24:1)
Isopropanol
4 M potassium acetate solution
Freezer (-20 ± 2) °C
70% Ethanol
Water, ASTM type I
PCR equipment (Thermal cycler, tubes…)
PCR buffer, primers, polymerase, nucleotides, DNAse- and RNAse-free ultrapure water (ASTM type I)
Cloning kit
Restriction enzymes (AluI, HhaI, HinfI and RsaI) for RFLP
ANNEX(informative)Procedures for wipe assays
Wipe assay 1 (standard wipe assay)
General
With this assay mesophilic aerobic spores and bacteria that are able to survive a heat treatment for 15 min at 80 °C are determined. The wipe assay corresponds basically to the swab assay procedure described in Annex D.1.
Standard membrane filter methods can be used to concentrate extraction suspension, as an alternative to these procedures.
The flow-chart for the standard wipe assay (wipe assay 1) is schematically shown in Figure E-1.
Sample collection
Prepare a sufficient number of sterile 15 cm x 15 cm polyester wipes prewetted with 4 ml water, ASTM type IIB, and sterile transport tubes or jars with buffer (20 ml PBS + 0,02 v/v % Tween 80, pH 7,2) to accommodate all samples to be collected, plus controls.
Rinse gloves with 70 % isopropyl alcohol between each sample, and change gloves at least once every 4 samples.
Place the wipe flat on the sample surface and rub over the entire surface using a firm, steady pressure. Refold the wipe by reversing the direction of the open fold so the contaminated surface is interior in the new configuration. Rub the wipe over the sample area a total of three times, rotating the direction of motion 90 degrees and 135 degrees, respectively, after each complete sampling of the area. Transfer the wipe into a sterile transport jar or tube.
Transport and storage
Transport samples to the laboratory and store at (4 – 8) °C and process within 24 hours.
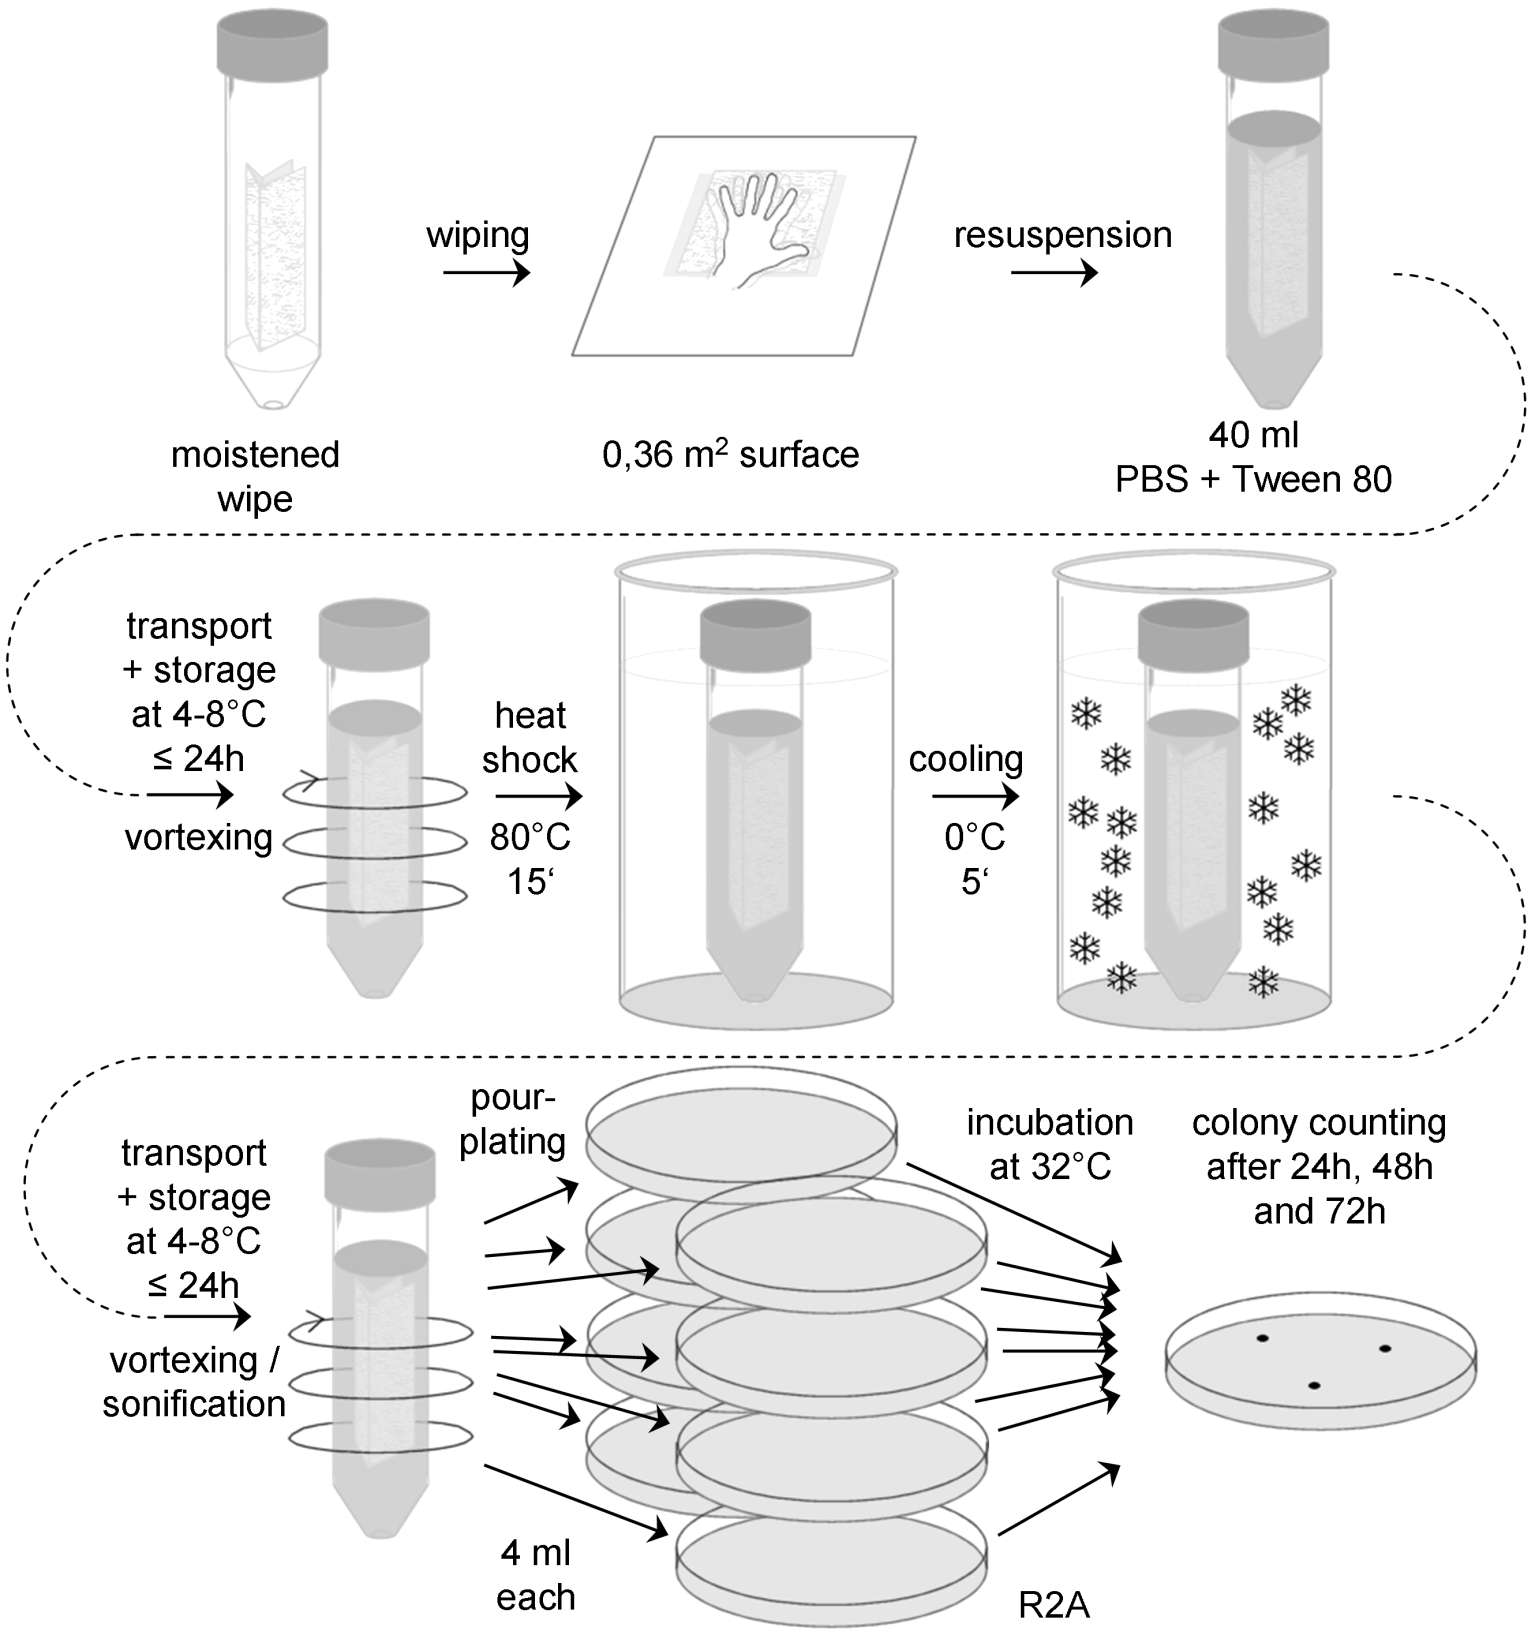 Figure: Flow chart for the standard wipe assay (wipe assay 1)
Extraction
Add 20 ml of sterile buffer (PBS + 0,02 v/v % Tween 80, pH 7,2) to each sample and reseal the jar or tube.
Vortex at maximum speed for (5 – 10) seconds, even if not very efficient for jars. Alternatively, if the wipe is in a jar that can be sealed tightly, close the lid and shake vigorously for 15 seconds.
Suspend sample jars or tubes in an ultrasonic bath, making sure the liquid level in the bath is above the fluid level in the sample jars or tubes and that the number of jars or tubes does not exceed the performance rating of the sonicator. Sonicate for (120 ± 5) s.
Heat shock
Place the jar or tube containing the vortexed and sonicated suspension and the wipe in a water bath at (80 ± 2) °C for 15 minutes, as determined by a pilot jar or tube containing a thermometer. Make certain the water bath level is above the level of the liquid content of each jar or tube being heated.
After heat shock, cool the jars or tubes rapidly to bring the contents to (30 35) °C. If the entire plating procedure requires more than 10 minutes, the heat shocked jars or tubes should be placed in an ice bath prior to plating.
Plating
If necessary, make appropriate dilutions of the wipe extraction suspension in sterile buffer (PBS + 0,02 v/v % Tween 80, pH 7,2).
Vortex wipe extraction suspension for 5 – 6 s and aseptically pipette 4,0 ml portions of the suspension into individual sterile 90 mm Petri plates. A total of 32 ml of suspension should be plated.
Add 20 ml sterile, molten (48 – 50) °C R2A to each plate and mix the contents by gentle swirling, and allow the mixture to solidify at room temperature.
Incubation
Plates should be incubated inverted at (32 ± 1) °C.
Counting
Examine the sample plates at 24 and 48 hours. If colonies visible by eyes are observed, count and record data. Examine and record final colony counts at 72 hours. Do not remove the Petri plate covers until the final 72 hour count is made.
Controls
For each six or fewer samples collected, also collect one 'field negative’ control.
Remove a sterile 15 cm x 15 cm wipe prewetted with 4 ml water, ASTM type IIB, from its transport tube, wave the wipe through the air for approximately 2 to 4 seconds, and place the wipe in a sterile transport tube or jar with buffer (20 ml PBS + 0,02 v/v % Tween 80, pH 7,2).
In the lab, create at least two ‘lab negative controls’ by placing a sterile 15 cm x 15 cm wipe prewetted with 4 ml water, ASTM type IIB, and insert it into in a sterile transport tube or jar with buffer (20 ml PBS + 0,02 v/v % Tween 80, pH 7,2) without exposing it to air.
Analyse the controls in the same way as the samples described above.
Equipment, reagents and consumable materials
Sterile 15 cm x 15 cm wipes prewetted with 4 ml water, ASTM type IIB
Transport tubes or jars with sterile buffer (20 ml PBS + 0,02 v/v % Tween 80, pH 7,2)
Refrigerator (4 – 8) °C
Cool box
Vortex mixer
Water bath (80 ± 2) °C
Ultrasonic bath
Ice bath
Thermometer
Pipette and tips
Laminar flow hood
Sterile spreaders
Petri dishes (90 mm)
R2A
Incubator (32 ± 1) °C
Sterile gloves
70 % IPA
Wipe assay 2
General
With this assay aerobic mesophiles are determined. The wipe assay corresponds basically to the swab assay procedures described in Annex D.2.
Standard membrane filter methods can be used to concentrate extraction suspension, as an alternative to these procedures.
The flow-chart for the wipe assay 2 is schematically shown in Figure E-2.
Sample collection
Prepare a sufficient number of sterile 15 cm x 15 cm wipes prewetted with 4 ml water, ASTM type IIB, and sterile transport tubes or jars with buffer (20 ml PBS + 0,02 v/v % Tween 80, pH 7,2) to accommodate all samples to be collected, plus controls.
Rinse gloves with 70 % isopropyl alcohol between each sample, and change gloves at least once every 4 samples.
Place the wipe flat on the sample surface and rub over the entire surface using a firm, steady pressure. Refold the wipe by reversing the direction of the open fold so the contaminated surface is interior in the new configuration. Rub the wipe over the sample area a total of three times, rotating the direction of motion 90 degrees and 135 degrees, respectively, after each complete sampling of the area. Transfer the wipe into a sterile transport jar or tube.
 Figure: Flow chart for wipe assay 2
Transport and storage
Transport samples to the laboratory and store at (4 – 8) °C and process within 24 hours.
Extraction
Add 20 ml of sterile buffer (PBS + 0,02 v/v % Tween 80, pH 7,2) to each sample and reseal the jar or tube.
Vortex at maximum speed for (5 – 10) seconds, even if not very efficient for jars. Alternatively, if the wipe is in a jar that can be sealed tightly, close the lid and shake vigorously for 15 seconds.
Suspend sample jars or tubes in an ultrasonic bath, making sure the liquid level in the bath is above the fluid level in the sample jars or tubes and that the number of jars or tubes does not exceed the performance rating of the sonicator. Sonicate for (120 ±5) s.
It is important not to perform a heat-shock.
Plating
If necessary, make appropriate dilutions of the wipe extraction suspension in sterile buffer (PBS + 0,02 v/v % Tween 80, pH 7,2).
Vortex wipe extraction suspension for 5 – 6 seconds and aseptically pipette 4,0 ml portions of the suspension into individual sterile 90 mm Petri plates. A total of 32 ml of suspension should be plated.
Add 20 ml sterile, molten (48 – 50) °C R2A to each plate and mix the contents by gentle swirling, and allow the mixture to solidify at room temperature.
Incubation
Plates should be incubated inverted at (32 ± 1) °C.
Counting
Examine the sample plates at 24 and 48 hours. If colonies visible by eyes are observed, count and record data. Examine and record final colony counts at 72 hours. Do not remove the Petri plate covers until the final 72 hour count is made.
Controls
For each six or fewer samples collected, also collect one 'field negative’ control.
Remove a sterile 15 cm x 15 cm wipe prewetted with 4 ml water, ASTM type IIB, from its transport tube, wave the wipe through the air for approximately 2 to 4 seconds, and place the wipe in a sterile transport tube or jar with buffer (20 ml PBS + 0,02 v/v % Tween 80, pH 7,2).
In the lab, create at least two ‘lab negative controls’ by placing a sterile 15 cm x 15 cm wipe prewetted with 4 ml water, ASTM type IIB, and insert it into in a sterile transport tube or jar with buffer (20 ml PBS + 0,02 v/v % Tween 80, pH 7,2) without exposing it to air.
Analyse the controls in the same way as the samples described above.
Equipment, reagents and consumable materials
Sterile 15 cm x 15 cm wipes prewetted with 4 ml water, ASTM type IIB
Transport tubes or jars with sterile buffer (20 ml PBS + 0,02 v/v % Tween 80, pH 7,2)
Refrigerator (4 – 8) °C
Cool box
Vortex mixer
Pipette and tips
Laminar flow hood
Sterile spreaders
Petri dishes (90 mm)
R2A
Incubator (32 ± 1) °C
Sterile gloves
70 % IPA
Wipe assay 3
General
With this assay aerobic psychrophils / psychrotolerants are determined. The wipe assay corresponds basically to the swab assay procedures described in Annex D.3.
Standard membrane filter methods can be used to test extraction suspension, as an alternative to these procedures.
The flow-chart for the wipe assay 2 is schematically shown in Figure E-3.
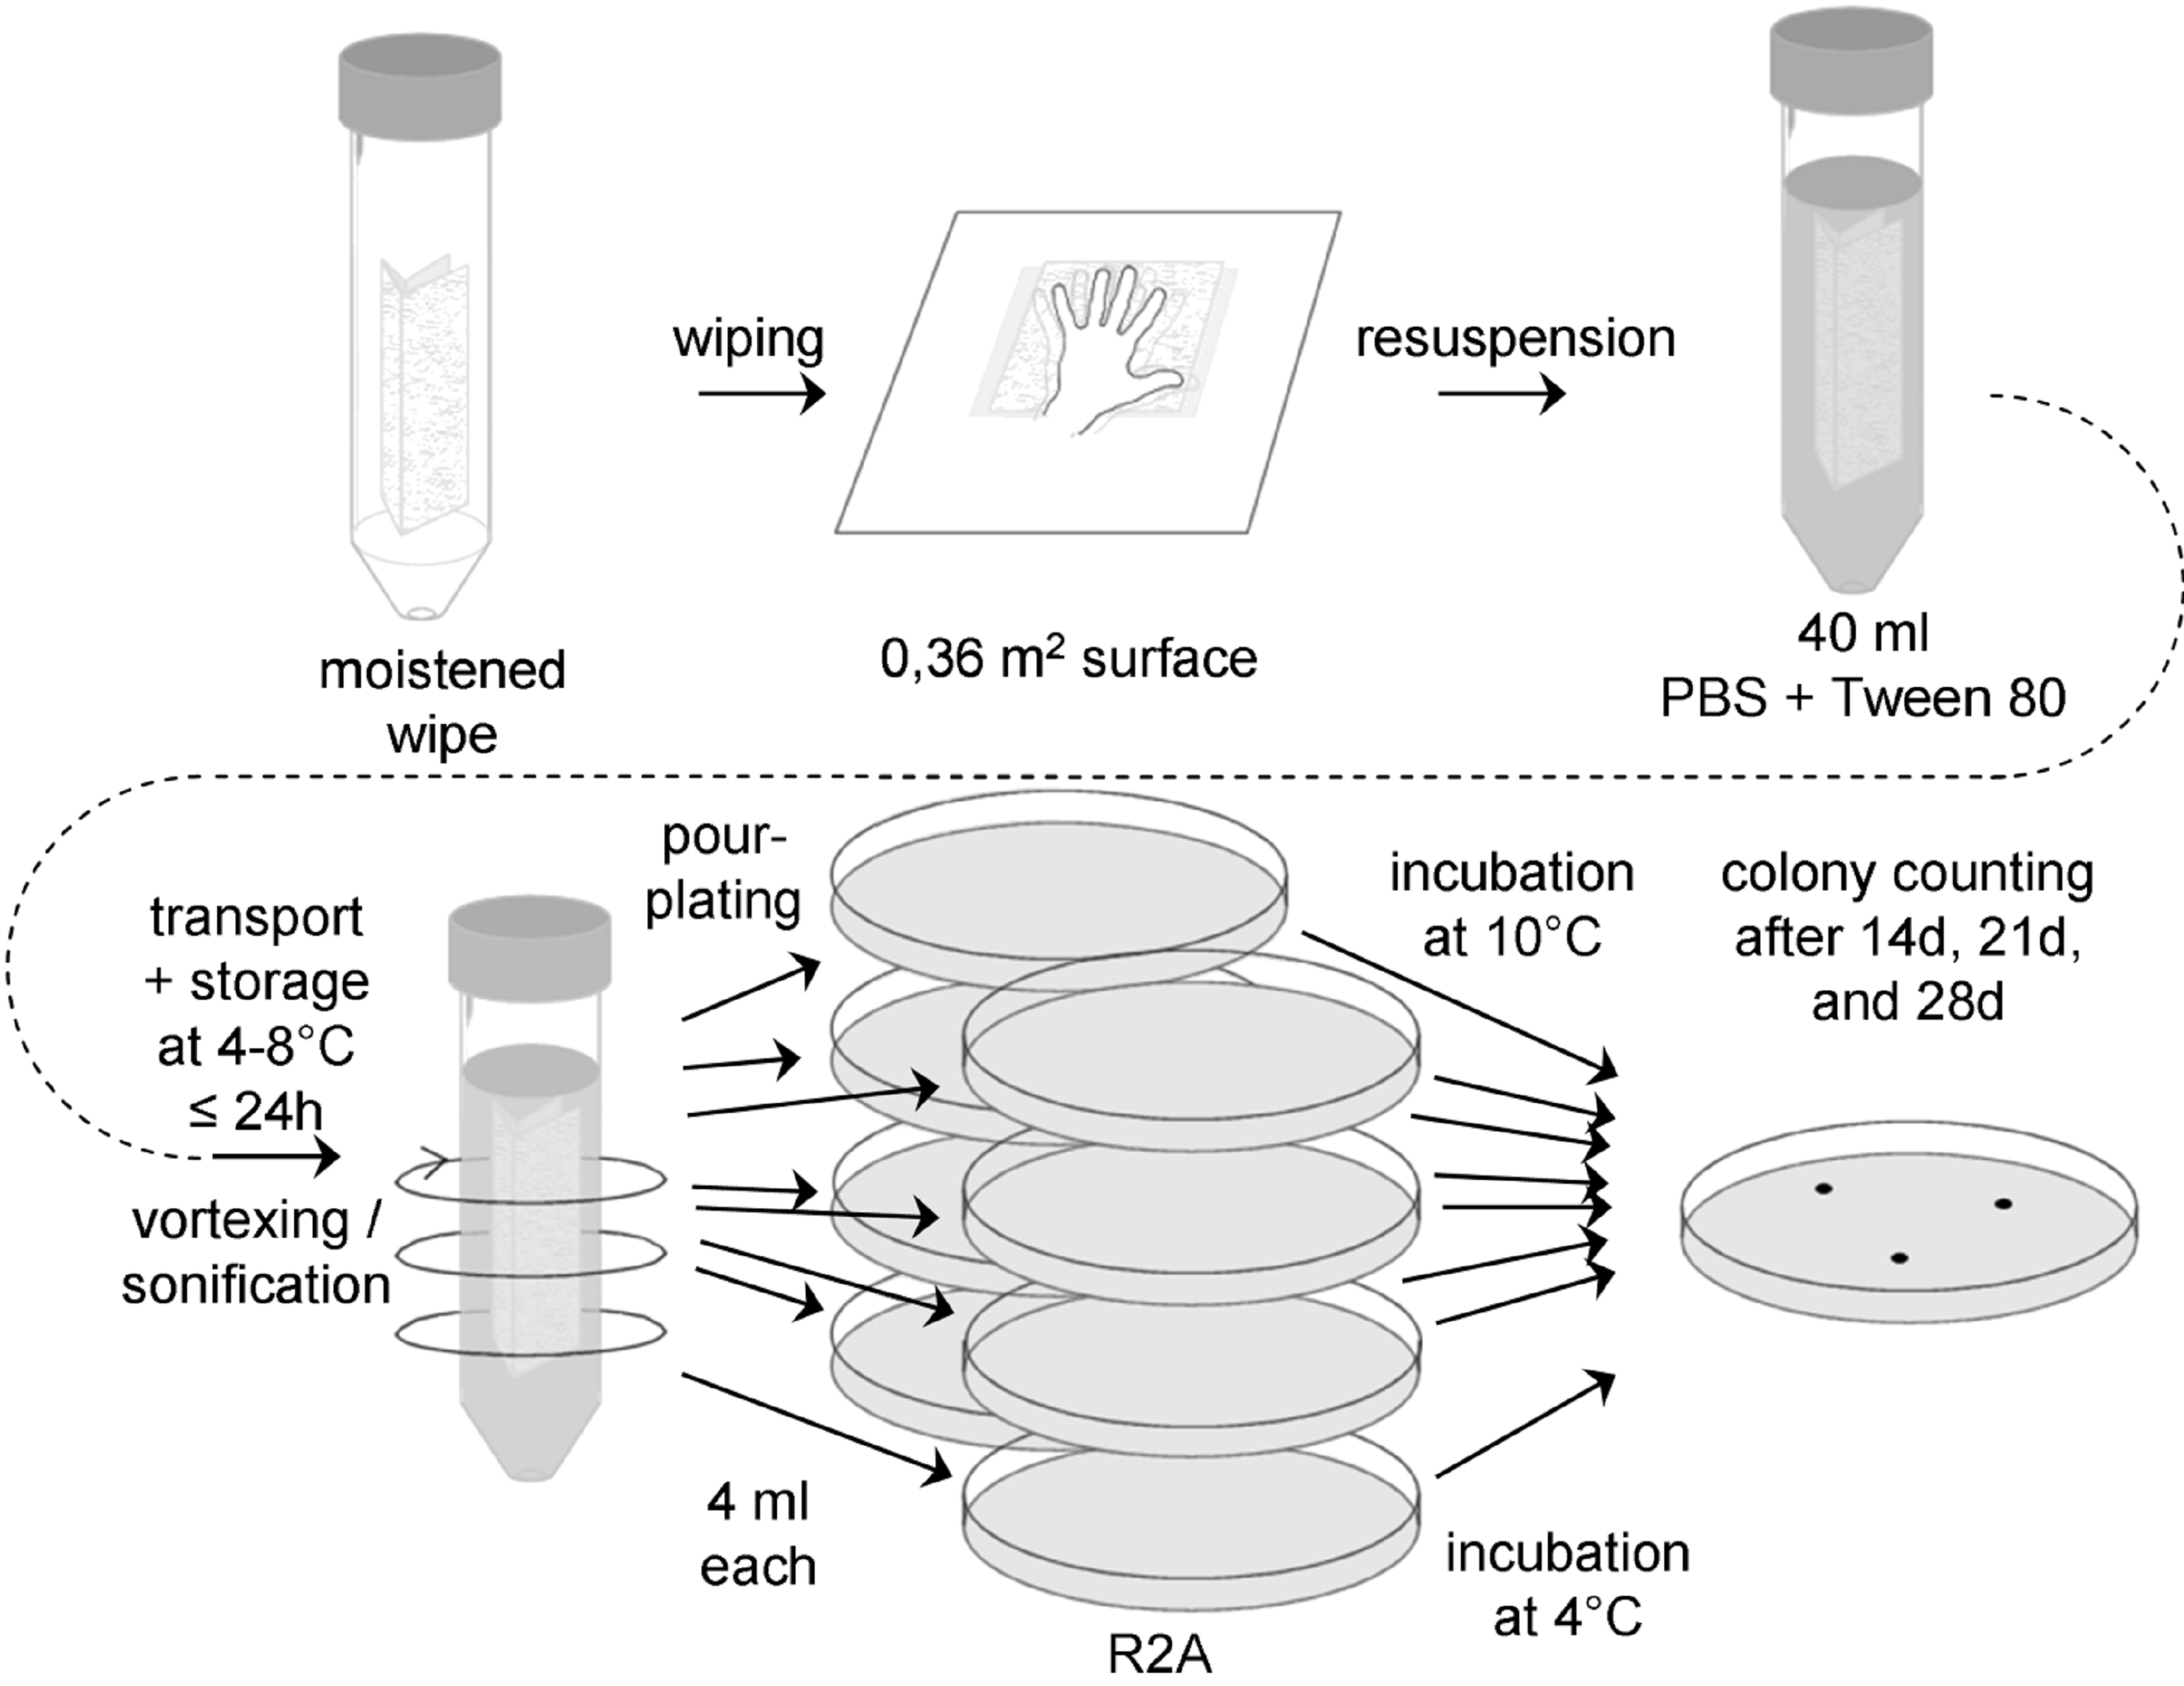 Figure: Flow chart for wipe assay 3
Sample collection
Prepare a sufficient number of sterile 15 cm x 15 cm wipes prewetted with 4 ml water, ASTM type IIB, and sterile transport tubes or jars with buffer (20 ml PBS + 0,02 v/v % Tween 80, pH 7,2) to accommodate all samples to be collected, plus controls.
Rinse gloves with 70 % isopropyl alcohol between each sample, and change gloves at least once every 4 samples.
Place the wipe flat on the sample surface and rub over the entire surface using a firm, steady pressure. Refold the wipe by reversing the direction of the open fold so the contaminated surface is interior in the new configuration. Rub the wipe over the sample area a total of three times, rotating the direction of motion 90 degrees and 135 degrees, respectively, after each complete sampling of the area. Transfer the wipe into a sterile transport jar or tube.
Transport and storage
Transport samples to the laboratory and store at (4 – 8) °C and process within 24 hours.
Extraction
Add 20 ml of sterile buffer (PBS + 0,02 v/v % Tween 80, pH 7,2) to each sample and reseal the jar or tube.
Vortex at maximum speed for (5 – 10) seconds, even if not very efficient for jars. Alternatively, if the wipe is in a jar that can be sealed tightly, close the lid and shake vigorously for 15 seconds.
Suspend sample jars or tubes in an ultrasonic bath, making sure the liquid level in the bath is above the fluid level in the sample jars or tubes and that the number of jars or tubes does not exceed the performance rating of the sonicator. Sonicate for (120 ± 5) s.
It is important not to perform a heat-shock.
Plating
If necessary, make appropriate dilutions of the wipe extraction suspension in sterile buffer (PBS + 0,02 v/v % Tween 80, pH 7,2).
Vortex wipe extraction suspension for (5 – 6) seconds and aseptically pipette 4,0 ml portions of the suspension into individual sterile 90 mm Petri plates. A total of 32 ml of suspension should be plated.
Add 20 ml sterile, molten (48 – 50) °C R2A to each plate and mix the contents by gentle swirling, and allow the mixture to solidify at room temperature.
Incubation
Four plates should be incubated inverted at (10 ± 1) °C, the other four at (4 ± 1) °C.
Counting
Examine the sample dishes at 14 and 21 days. If colonies visible by eyes are observed, count and record data. Examine and record final colony counts at 28 days. Do not remove the Petri plate covers until the final 28 days count is made. Keeping photographic evidence for biodiversity determination can be helpful. If necessary, replate the colonies before identification and archiving.
Controls
For each six or fewer samples collected, also collect one 'field negative’ control.
Remove a sterile 15 cm x 15 cm wipe prewetted with 4 ml water, ASTM type IIB, from its transport tube, wave the wipe through the air for approximately 2 to 4 seconds, and place the wipe in a sterile transport tube or jar with buffer (20 ml PBS + 0,02 v/v % Tween 80, pH 7,2).
In the lab, create at least two ‘lab negative controls’ by placing a sterile 15 cm x 15 cm wipe prewetted with 4 ml water, ASTM type IIB, and insert it into in a sterile transport tube or jar with buffer (20 ml PBS + 0,02 v/v % Tween 80, pH 7,2) without exposing it to air.
Analyse the controls in the same way as the samples described above.
Equipment, reagents and consumable materials
Sterile 15 cm x 15 cm wipes prewetted with 4 ml water, ASTM type IIB
Transport tubes or jars with sterile buffer (20 ml PBS + 0,02 v/v % Tween 80, pH 7,2)
Refrigerator (4 – 8) °C
Cool box
Vortex mixer
Pipette and tips
Laminar flow hood
Sterile spreaders
Petri dishes (90 mm)
R2A
Incubator (32 ± 1) °C
Sterile gloves
70 % IPA
Wipe assay 4
General
With this assay aerobic mesophilic fungi, that is yeasts and molds, are determined. The wipe assay corresponds basically to the swab assay procedures described in Annex D.4.
Standard membrane filter methods can be used to test extraction suspension, as an alternative to these procedures.
The flow-chart for the wipe assay 2 is schematically shown in Figure E-4.
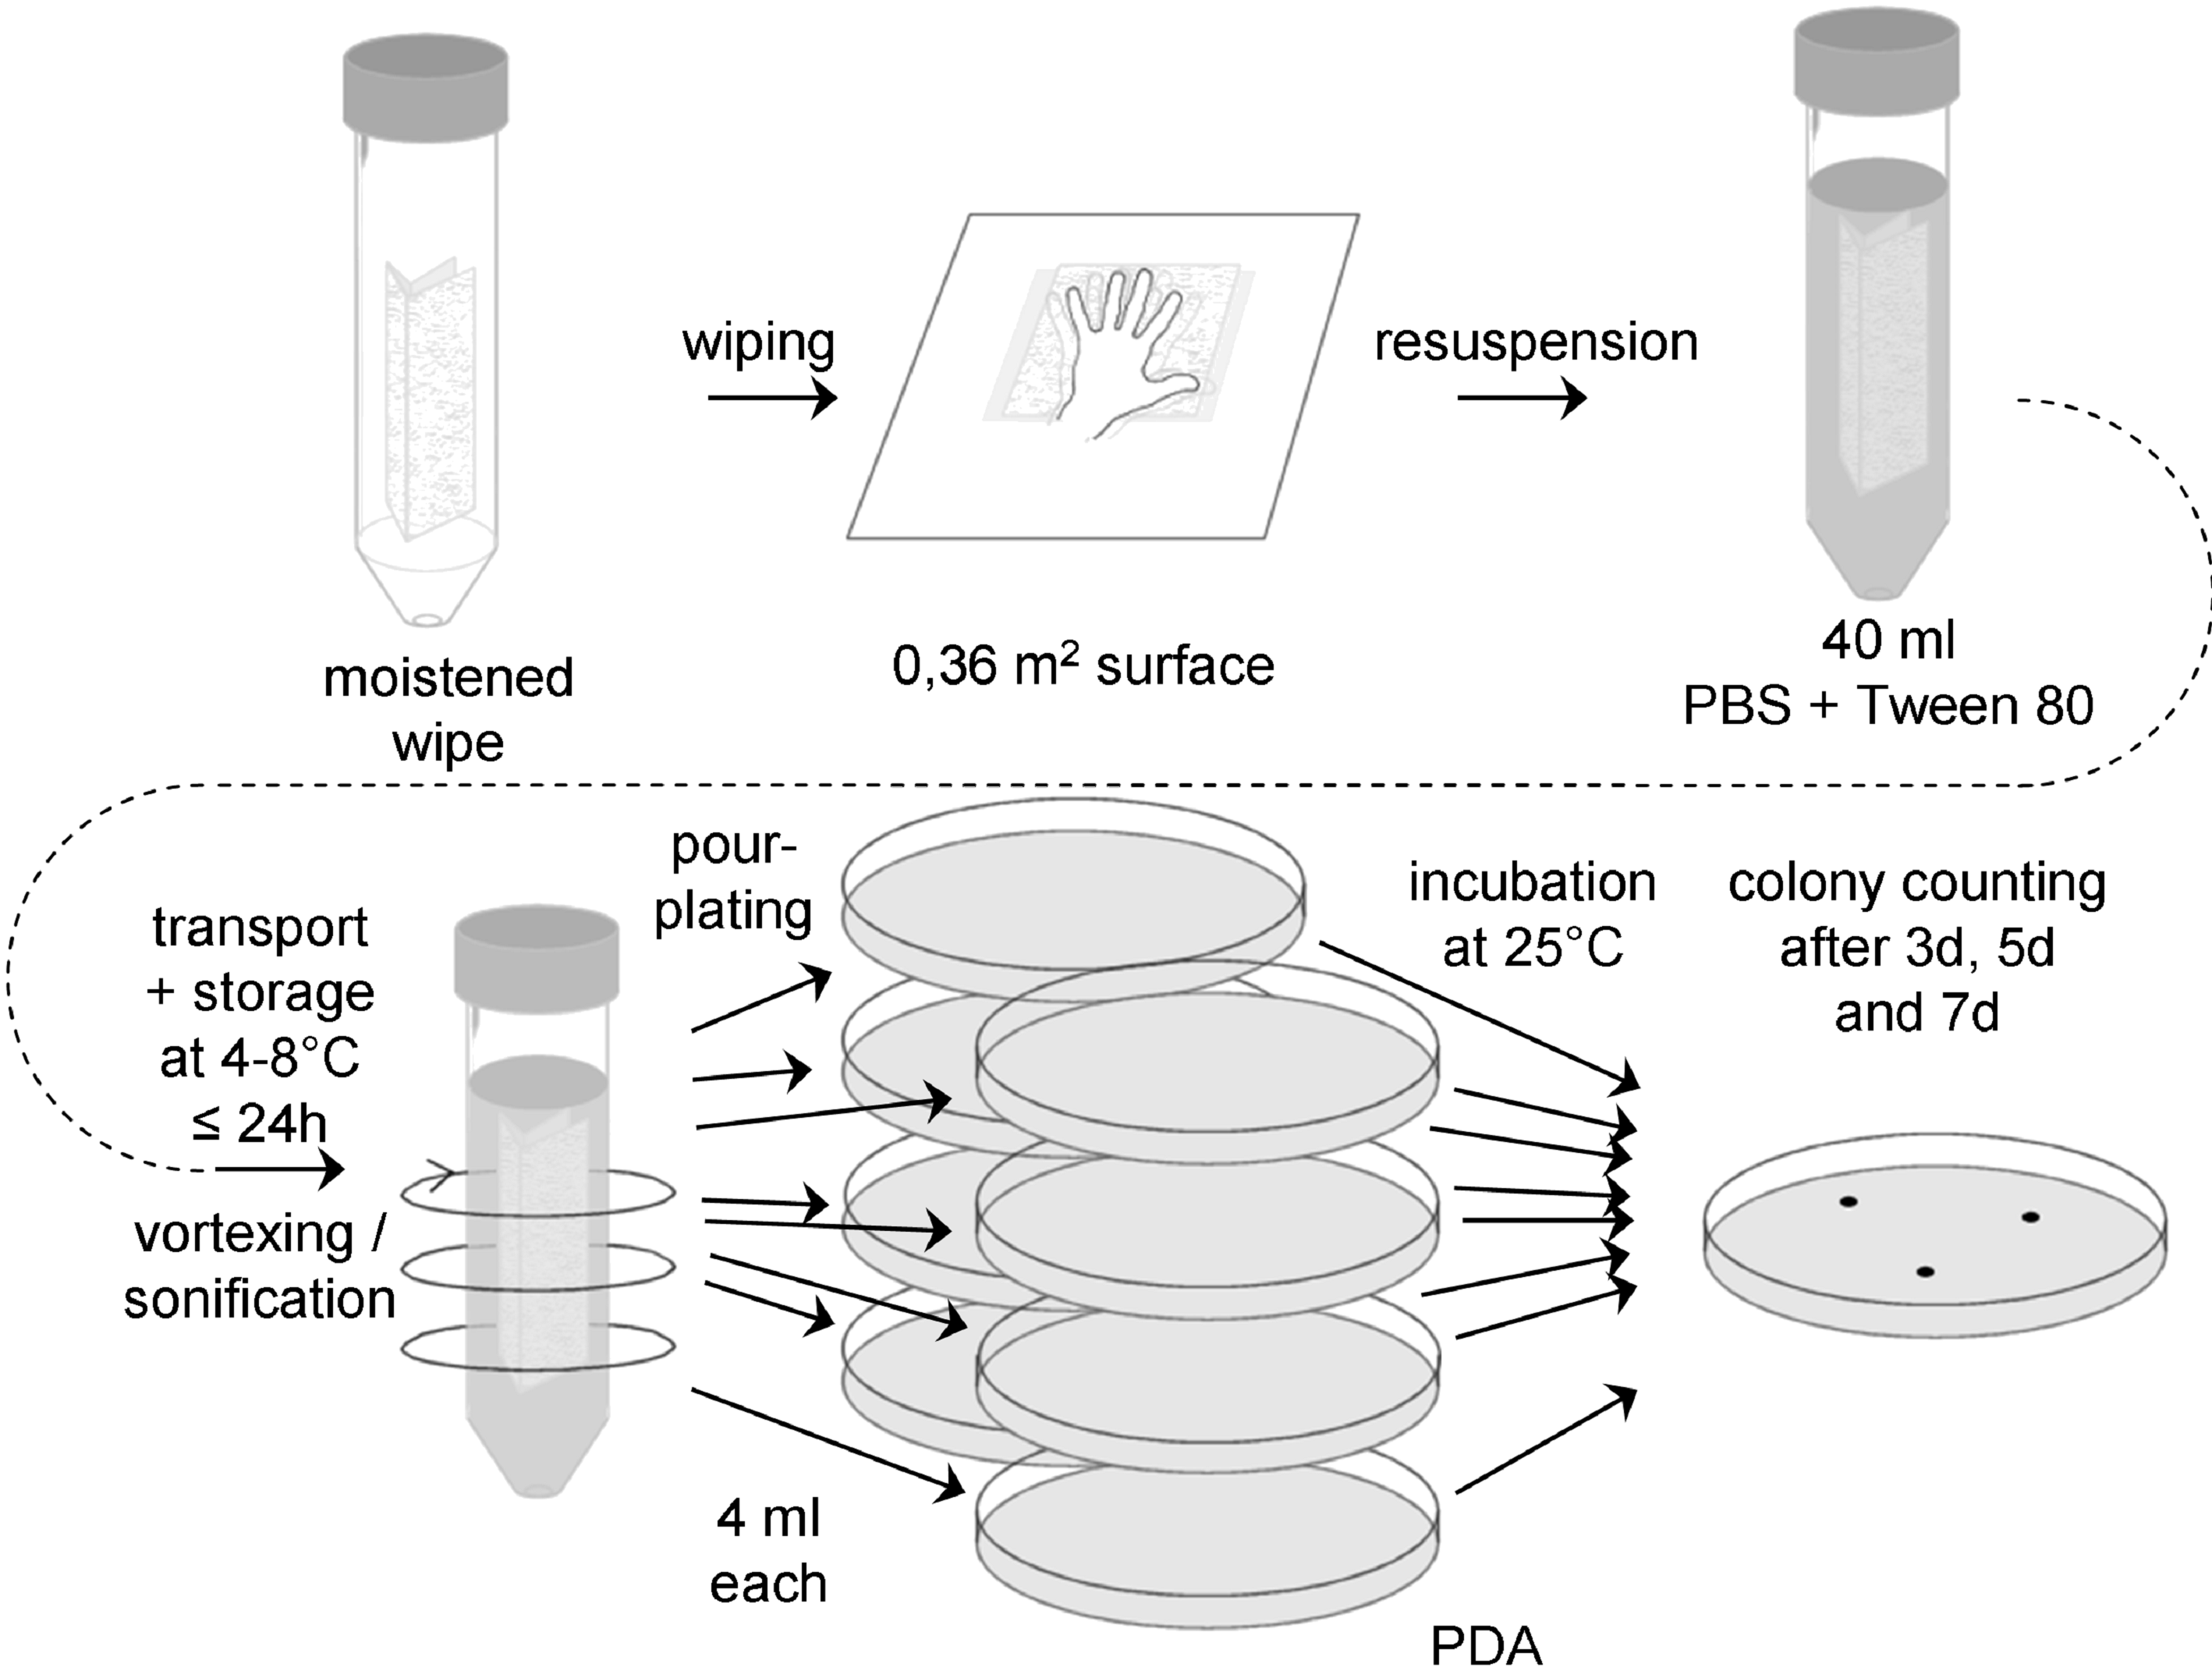 Figure: Flow chart for wipe assay 4
Sample collection
Prepare a sufficient number of sterile 15 cm x 15 cm wipes prewetted with 4 ml water, ASTM type IIB, and sterile transport tubes or jars with buffer (20 ml PBS + 0,02 v/v % Tween 80, pH 7,2) to accommodate all samples to be collected, plus controls.
Rinse gloves with 70% isopropyl alcohol between each sample, and change gloves at least once every 4 samples.
Place the wipe flat on the sample surface and rub over the entire surface using a firm, steady pressure. Refold the wipe by reversing the direction of the open fold so the contaminated surface is interior in the new configuration. Rub the wipe over the sample area a total of three times, rotating the direction of motion 90 degrees and 135 degrees, respectively, after each complete sampling of the area. Transfer the wipe into a sterile transport jar or tube.
Transport and storage
Transport samples to the laboratory and store at (4 – 8) °C and process within 24 hours.
Extraction
Add 20 ml of sterile buffer (PBS + 0,02 v/v % Tween 80, pH 7,2) to each sample and reseal the jar or tube.
Vortex at maximum speed for 5-10 seconds, even if not very efficient for jars. Alternatively, if the wipe is in a jar that can be sealed tightly, close the lid and shake vigorously for 15 seconds.
Suspend sample jars or tubes in an ultrasonic bath, making sure the liquid level in the bath is above the fluid level in the sample jars or tubes and that the number of jars or tubes does not exceed the performance rating of the sonicator. Sonicate for (120 ± 5) s.
Do not perform a heat-shock.
Plating
If necessary, make appropriate dilutions of the wipe extraction suspension in sterile buffer (PBS + 0,02 v/v % Tween 80, pH 7,2).
Vortex wipe extraction suspension for (5 – 6) seconds and aseptically pipette 4,0 ml portions of the suspension into individual sterile 90 mm Petri dishes. A total of 32 ml of suspension should be plated.
Add 20 ml sterile, molten (48 – 50) °C PDA to each plate and mix the contents by gentle swirling, and allow the mixture to solidify at room temperature.
Incubation
Plates should be incubated inverted at (25 ± 1) °C.
Counting:
Examine the sample plates at 3, 5 and 7 days. If colonies visible by eyes are observed, count and record data. If necessary, replate the colonies before identification and archiving. Keeping photographic evidence for biodiversity determination can be helpful.
Controls
For each six or fewer samples collected, also collect one 'field negative’ control.
Remove a sterile 15 cm x 15 cm wipe prewetted with 4 ml water, ASTM type IIB, from its transport tube, wave the wipe through the air for approximately 2 to 4 seconds, and place the wipe in a sterile transport tube or jar with buffer (20 ml PBS + 0,02 v/v % Tween 80, pH 7,2).
In the lab, create at least two ‘lab negative controls’ by placing a sterile 15 cm x 15 cm wipe prewetted with 4 ml water, ASTM type IIB, and insert it into in a sterile transport tube or jar with buffer (20 ml PBS + 0,02 v/v % Tween 80, pH 7,2) without exposing it to air.
Analyse the controls in the same way as the samples described above.
Equipment, reagents and consumable materials
Sterile 15 cm x 15 cm wipes prewetted with 4 ml water, ASTM type IIB
Transport tubes or jars with sterile buffer (20 ml PBS + 0,02 v/v % Tween 80, pH 7,2)
Refrigerator (4 – 8) °C
Cool box
Vortex mixer
Pipette and tips
Laminar flow hood
Sterile spreaders
Petri dishes (90 mm)
PDA
Incubator (25 ± 1) °C
Sterile gloves
70 % IPA
Wipe assay 5
General
With this assay anaerobic mesophiles are determined. The wipe assay corresponds basically to the swab assay procedures described in Annex D.5.
Standard membrane filter methods can be used to test extraction suspension, as an alternative to these procedures.
The flow-chart for the wipe assay 2 is schematically shown in Figure E-5.
Sample collection
Prepare a sufficient number of sterile 15 cm x 15 cm wipes prewetted with 4 ml water, ASTM type IIB. Also prepare a sufficient number of 100 ml bottles with 80 ml anaerobic buffer (PBS + 0,02 v/v % Tween 80). Add sodium resazurin (0,001 g/l) as redox indicator. Bubble buffer with nitrogen. Reduce PBS by adding 0,5 g/l sodium sulfide x 9 H2O. Adjust pH to 7,2 using disposable syringes and hypodermic needles. Redox indicator should turn colourless. Under anaerobic conditions (anaerobic chamber), prepare 80 ml aliquots in glass bottles, seal with butyl- rubber stoppers and screw cap with hole. Add nitrogen gas by flushing and applying vacuum alternately. Autoklave.
Before sampling prepare also a mixture of cystein-HCl and sodium sulfide as follows: Dissolve 0,5 g cystein- HCl and 0,5 g Na2S x 9 H2O in 10 ml of distilled water. Adjust pH to 7. Store under nitrogen gas phase. Autoklave.
Directly before sampling, remove screw cap of a bottle with anaerobic buffer.
Rinse gloves with 70 % isopropyl alcohol between each sample, and change gloves at least once every 4 samples.
Place the wipe flat on the sample surface and rub over the entire surface using a firm, steady pressure. Refold the wipe by reversing the direction of the open fold so the contaminated surface is interior in the new configuration. Rub the wipe over the sample area a total of three times, rotating the direction of motion 90 degrees and 135 degrees, respectively, after each complete sampling of the area.
Remove stopper from anaerobic bottle, drob wipe into PBS, close bottle immediately with a new sterile stopper. Shake bottle gently, so that the whole wipe is covered by the liquid. If the redox indicator turns red, reduce tube content by adding 0,1 ml of a mixture of cystein-HCl and sodium sulfide by using a sterile disposable syringe and a hypodermic needle. Increase the concentration of reducing agents stepwise (0,1 ml), if redox indicator does not turn colourless after a certain time.
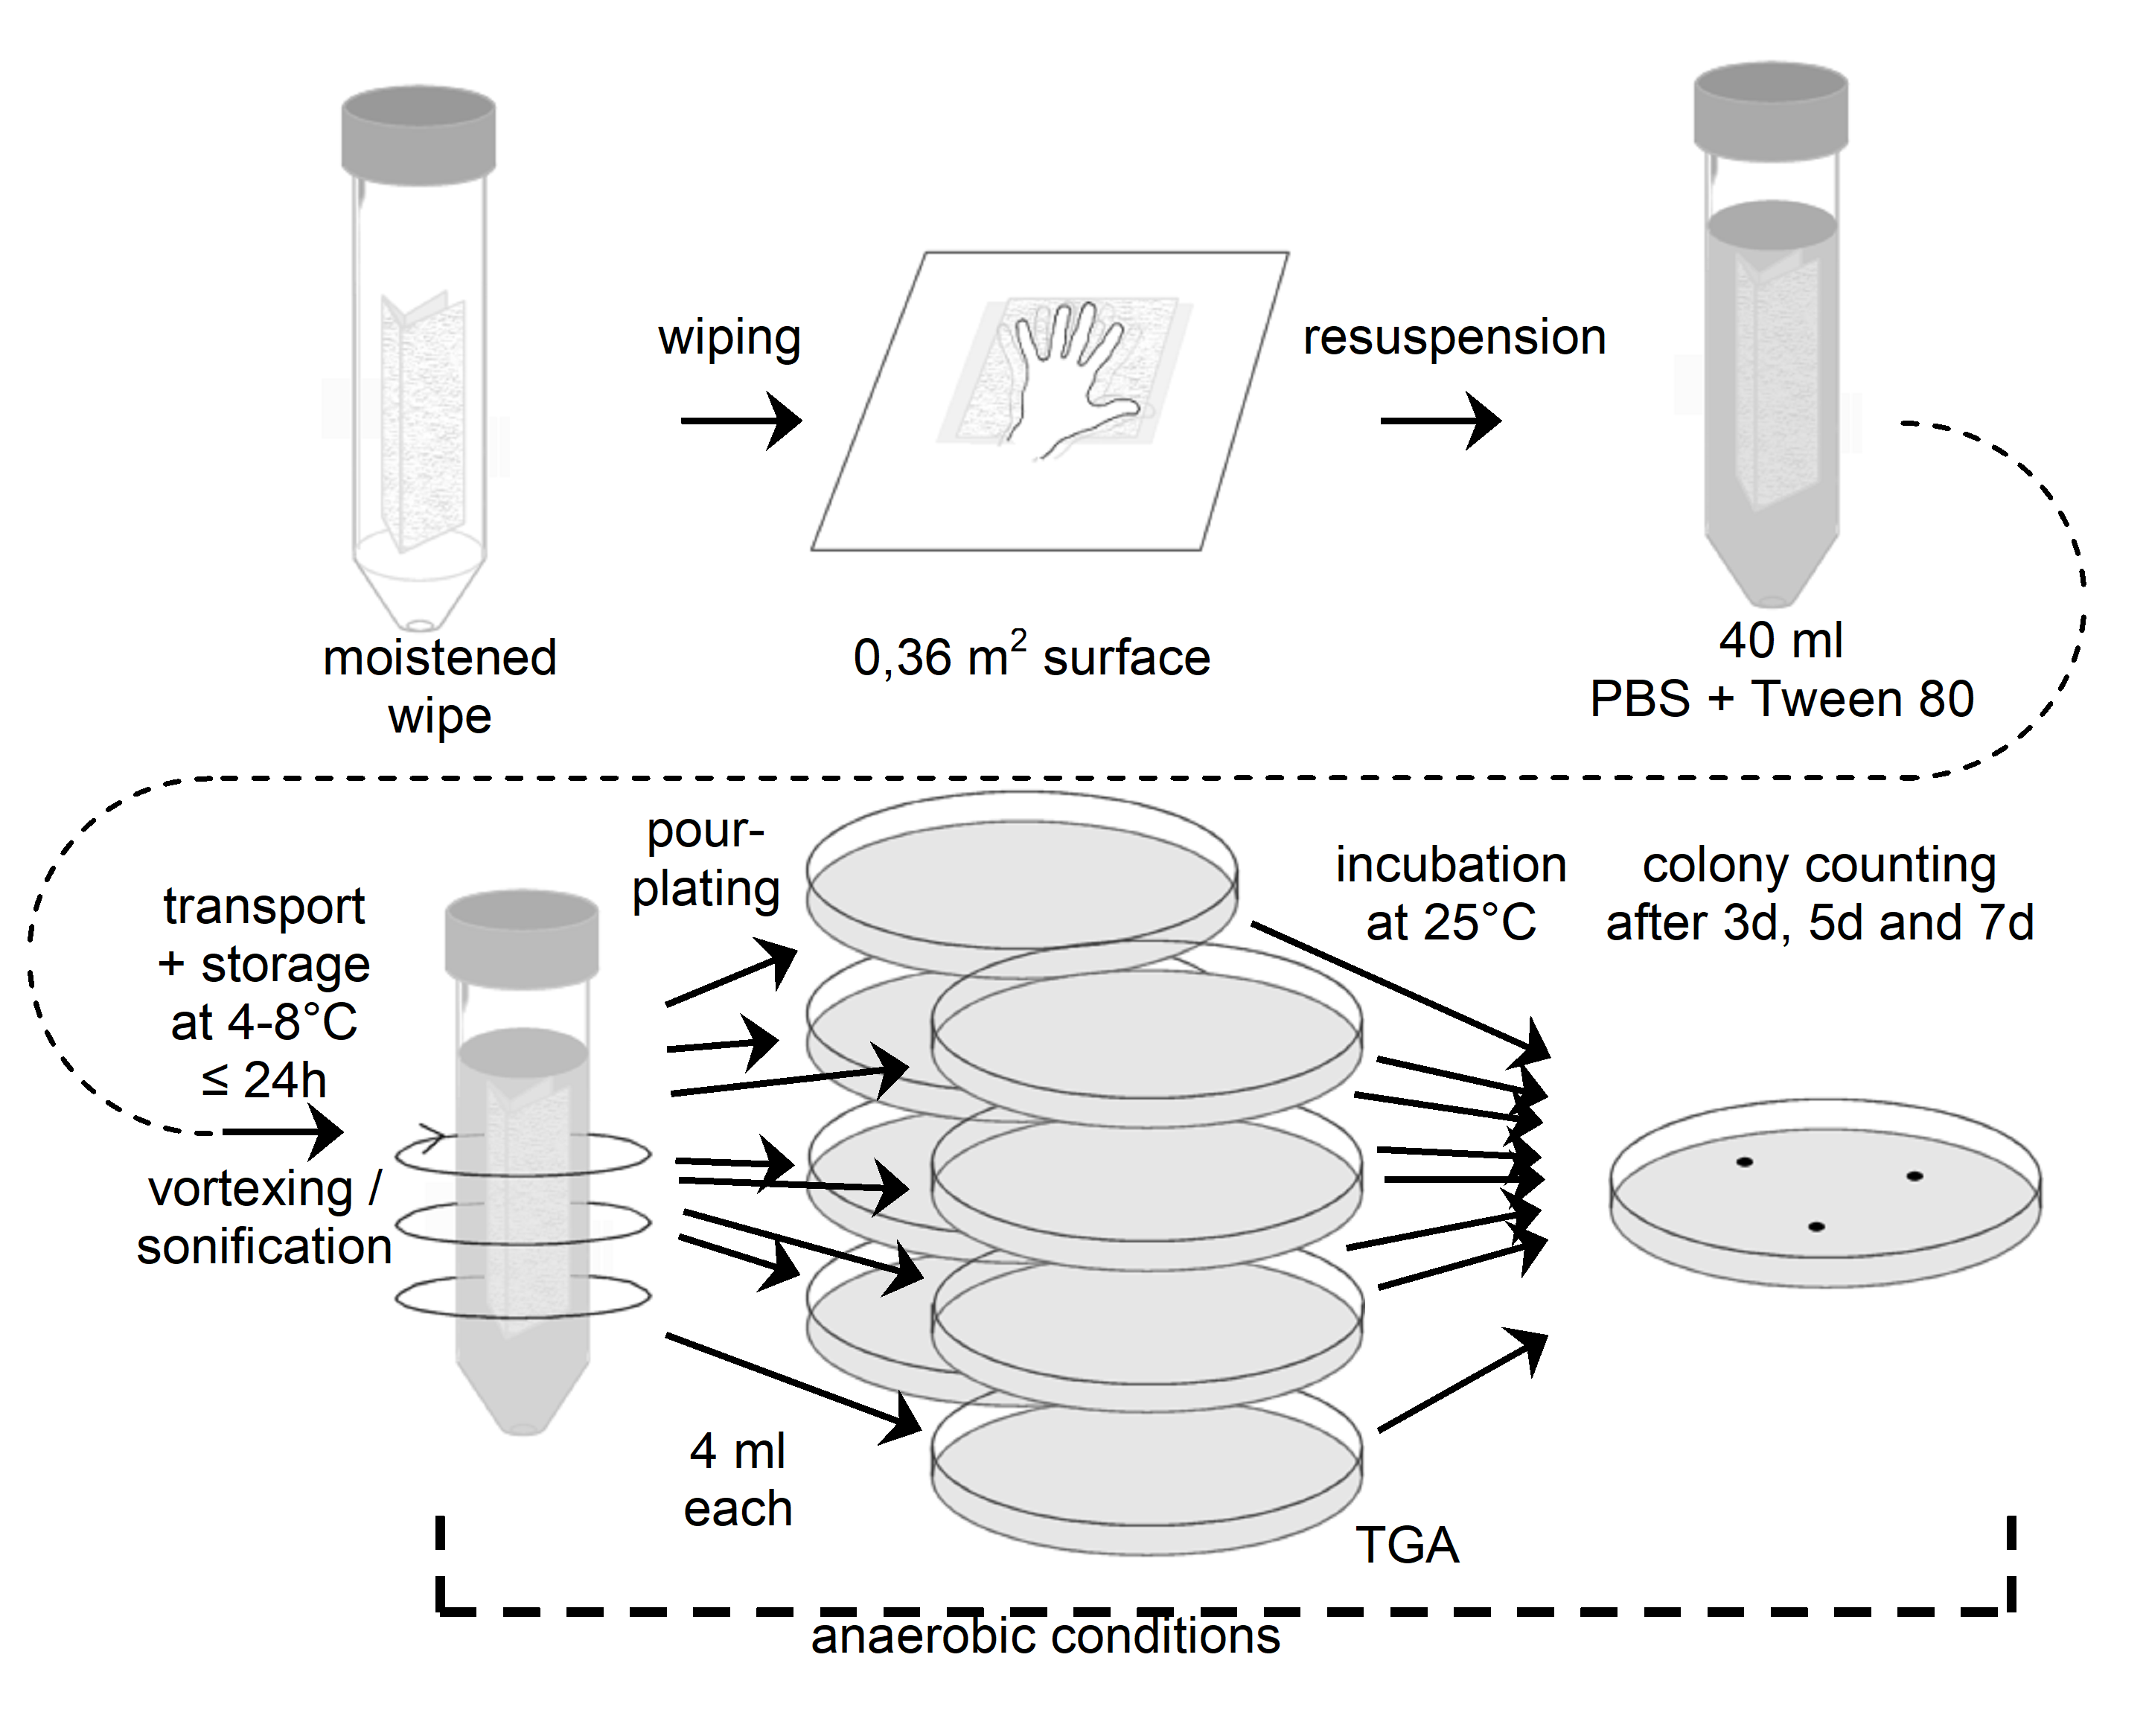 Figure: Flow chart for wipe assay 5 (anaerobic conditions from resuspension onwards)
Transport and storage
Transport samples to the laboratory and store at (4 – 8) °C and process within 24 hours.
Extraction
Vortex at maximum speed for (5 – 10) seconds, even if not very efficient for jars. Alternatively, if the wipe is in a jar that can be sealed tightly, close the lid and shake vigorously for 15 seconds.
Suspend sample jars or tubes in an ultrasonic bath, making sure the liquid level in the bath is above the fluid level in the sample jars or tubes and that the number of jars or tubes does not exceed the performance rating of the sonicator. Sonicate for (120 ± 5) s.
It is important not to perform a heat-shock.
Plating
Perform plating under anaerobic conditions. Aseptically pipette 1 ml aliquots of the swab extraction suspension onto the surface of TG agar plates, using 20 ml total.
Use a sterile spreader to spread the dilution over the surface as evenly as possible. Allow the moisture to be absorbed into the agar before incubation.
Incubation
Petri dishes should be incubated inverted at (32 1) °C under anaerobic conditions.
Counting
Examine the sample plates at 3 days, 7 days and 14 days. If colonies visible by eyes are observed, count and record data. If necessary, replate the colonies under anaerobic conditions before identification and archiving. Keeping photographic evidence for biodiversity determination can be helpful.
Controls
For each six or fewer samples collected, also collect a 'field negative’ control.
Remove a sterile 15 cm x 15 cm wipe prewetted with 4 ml water, ASTM type IIB, from its transport tube, wave the wipe through the air for approximately 2 to 4 seconds, and place the wipe in a bottle with sterile anaerobic buffer (80 ml PBS + 0,02 v/v % Tween 80, pH 7,2).
In the lab, create at least two ‘lab negative controls’ by placing a sterile 15 cm x 15 cm wipe prewetted with 4 ml water, ASTM type IIB, and insert it into in a bottle with sterile anaerobic buffer (80 ml PBS + 0,02 v/v % Tween 80, pH 7,2) without exposing it to air.
Analyse the controls in the same way as the samples described above.
Equipment, reagents and consumable materials
General equipment for the cultivation of anaerobic microorganisms (e.g. gas station, glove box)
Sterile 15 cm x 15 cm wipes prewetted with 3 ml water, ASTM type IIB
Bottles with anaerobic sterile buffer (20 ml PBS + 0,02 v/v % Tween 80, pH 7,2)
Tube with a mixture of cystein-HCl and sodium sulfide
Hypodermic needles and syringes
Sterile stoppers
Sterile gloves
70 % IPA
Cool box
Refrigerator (4 – 8) °C
Vortex mixer
Ultrasonic bath
Microliter pipette and sterile tips
Sterile spreaders
TG agar plates (90 mm)
Anaerobic jar
Incubator (32 ± 1) °C
Wipe assay 6
General
With this assay DNA is extracted for molecular biodiversity determination, which also includes the identification of non-cultivable microorganisms (Bacteria, Archaea and Fungi). After the DNA extraction the 16S/18S rRNA gene is amplified, cloned and sequenced. For all steps sterile DNAse- and RNAse-free ultrapure water (ASTM type I, see ASTM D 1193) should be used.
The wipe assay corresponds basically to the swab assay procedures described in Annex D.6.
Methods for taxonomic allocation deduced by sequence comparison with public 16 S rRNA gene data bases are not part of this standard.
Sample collection
Prepare a sufficient number of sterile 15 cm x 15 cm wipes prewetted with 4 ml water, ASTM type I, and sterile transport tubes or jars with water, ASTM type I, (20 ml) to accommodate all samples to be collected, plus controls.
Use new sterile gloves for each sample.
Place the wipe flat on the sample surface and rub over the entire surface using a firm, steady pressure. Refold the wipe by reversing the direction of the open fold so the contaminated surface is interior in the new configuration. Rub the wipe over the sample area a total of three times, rotating the direction of motion 90 degrees and 135 degrees, respectively, after each complete sampling of the area. Transfer the wipe into a sterile transport jar or tube.
Transport and storage
Transport samples to the laboratory and store at (4 – 8) °C and process within 24 hours.
Extraction
Add 20 ml of water, ASTM type I, to each sample and reseal the jar or tube.
Suspend sample jars or tubes in an ultrasonic bath, making sure the liquid level in the bath is above the fluid level in the sample jars or tubes and that the number of jars or tubes does not exceed the performance rating of the sonicator. Sonicate 2 minutes 5 seconds. Vortex at maximum speed for (5 - 10) seconds, even if not very efficient for jars. Alternatively, if the wipe is in a jar that can be sealed tightly, close the lid and shake vigorously for 15 seconds.
For DNA extraction, concentration of the sample using appropriate centrifugal filter devices is strongly recommended.
Starting with 1 ml sample add 1 ml of 2x XS buffer (20 ml stock solution: 4 ml 1 M Tris/HCl, pH 7,4; 4,56 ml 7 M ammonium acetate; 3,2 ml 250mM EDTA; 4 ml 10% (w/v) SDS); 0,4 g potassium ethyl xanthogenate; 4,99 ml sterile DNAse- and RNAse-free ultrapure water; Prepare 2x XS buffer freshly every time). Mix sample gently (short vortex). Incubate 2 h at 65 °C (90 °C for Fungi), mixing by hand about every 30 minutes. Vortex for 10 sec after incubation. Place tube on ice for 10 minutes. Centrifuge (1000 rpm, 5 min, 4 °C), discard pellet. Add same volume of phenol:chloroform-isoamylalcohol (25:24:1), mix gently and centrifuge (5000 rpm, 5min, 15°C). Transfer (upper) aqueous layer in a new tube. To precipitate DNA add same volume of cold 100% isopropanol and 1/10 volume of 4M potassium acetate. Mix gently. Incubate at –20°C over night. Centrifuge (13000 rpm, 30 min, 4 °C). Wash pellet with 1ml 70% ethanol (ice cold) and centrifuge (13000 rpm, 30 min, 4 °C). Dry pellet and dissolve it in 15 µl sterile DNAse- and RNAse-free ultrapure water (ASTM type I).
The usage of a PhaseLock Gel tube is recommended.
DNA amplification by PCR
The following primers should be used for amplification of 16 S rRNA gene from Archaea and Bacteria and 18S rRNA gene from fungi are shown in Table E-1.
Table: Primers for amplification of 16S rDNA from Archaea, Bacteria and Fungi
|
Target
|
Forward (5’ – 3’)
|
Reverse (5’ – 3’)
|
Reference
|
|
Archaea
|
345afCGGGGYGCASCAGGCGCGAA
|
1406uRACGGGCGGTGTGTRCAA
|
Burggraf et al., 1997; Lane, 1991
|
|
Bacteria
|
9bfGRGTTTGATCCTGGCTCAG
|
1406uRACGGGCGGTGTGTRCAA
|
Burggraf et al., 1992; Lane, 1991
|
|
Fungi
|
EF4F GGAAGGG[G/A]TGTATTTATTAG
|
EF3R TCCTCTAAATGACCAAGTTTG
|
Smit et al., 1999
|
PCR conditions
The following notes should be taken into account for the PCR conditions.
- 1 Usage of LowDNA-Taq or PfU Taq for bacterial PCR is recommended.
- 2 The preparation of the PCR mixtures under sterile conditions (sterile hood), using aerosol filter pipette tips, is strongly recommended for environmental samples.
- 3 For each primer combination a negative control (water instead of DNA) and a positive control is recommended.
- 4 Hotstart- PCR is recommended.
For a 20 µl PCR assay the following composition is recommended: PCR buffer, incl. MgCl2 (10x): 2 µl; nucleotide mix (10 mM each): 0,5 µl; F-primer (25 ng/µl): 1 µl; R-primer (25 ng/µl): 1µl; (LD)-Taq (5 U/µl): 0,125 µl; DNAse- and RNAse-free ultrapure water: 14,38 µl; template DNA (10 ng/µl): 1 µl. For the amplification of bacterial or archaeal 16S rRNA gene sequences, perform the following PCR cycles: 96 °C for 90 s; 10 cycles of 96 °C for 30 s, 60 °C for 30 s, and 72 °C for 1 min; 25 cycles of 94 °C for 20 s, 60 °C for 30 s, and 72 °C for 1 min and a final incubation at 72 °C for 10 min.
For the amplification of fungal 18S rRNA gene sequences, perform the following PCR cycles: 94 °C for 3 min; 40 cycles of 94 °C for 1 min, 48 °C for 1 min, and 72 °C for 3 min and a final incubation at 72 °C for 10 min. After PCR, the length of the PCR product obtained should be checked on a agarose gel. The PCR product can now be used for sequencing reactions or cloning for environmental samples.
Cloning of PCR products
Cloning should be done according the manufacturer's recommendations, as given in the kit manual.
Screening of clones
The presence of inserts of the expected sizes should be analyzed by direct PCR screening of transformants without plasmid extraction.
Pick a small part of each colony, using tooth picks (sterile) and perform colony PCR with the plasmid-specific primers (streak the same tooth pick on a new agar plate for storage of the colony). Check the sizes of the inserts by electrophoresis (use 5 µl of PCR product). Subject the remaining PCR product to RFLP analysis, using the enzymes AluI, HhaI, HinfI and RsaI according manufacturer's recommendations. Select representative transformants on the basis of the 16S rRNA gene fingerprint pattern. Grow these in liquid medium and purify plasmids for sequencing reaction.
Controls
For each step of the method, appropriate controls are recommended. For DNA extraction, a field blank control, as well as a lab control and a water control should be performed.
Field blank controls
Expose wipe or swab to the air in the clean room during sampling (wave) and proceed with this control like with the samples
Lab control
Expose wipe or swab to the air in the lab laminar flow and proceed with this control like with the samples.
Water control
Instead of swab sample extract use sterile DNAse- and RNAse-free ultrapure water for DNA extraction.
For PCR use the three blanks mentioned above. Additionally use one PCR blank (water instead of sample). For PCR the usage of positive controls is also strongly recommended.
Analyse the controls in the same way as the samples described above.
Equipment, reagents and consumable materials
Sterile 15 cm x 15 cm wipes prewetted with 3 ml water, ASTM type I
Sterile gloves
Sterile transport jars or tubes
Cool box
Refrigerator (4 – 8) °C
Water, ASTM type I
Ultrasonic bath
Vortex mixer
2 ml tubes
2x XS buffer solution
Water bath (65 ± 2) °C or (90 ± 2) °C
Ice
Laboratory centrifuge
Phenol:chloroform:isoamylalcohol (25:24:1)
Isopropanol
4 M potassium acetate solution
Freezer (-20 ± 2) °C
70% Ethanol
PCR equipment (Thermal cycler, tubes…)
PCR buffer, primers, polymerase, nucleotides, DNAse- and RNAse-free ultrapure water (ASTM type I)
Cloning kit
Restriction enzymes (AluI, HhaI, HinfI and RsaI) for RFLP
ANNEX(informative)Procedures for contact plates
Contact plates
General
With this assay aerobic mesophiles from plane, smooth and dry cleanroom or garment surfaces are determined.
Sample collection
An appropriate number of ready-to-use R2A contact plates of each purchased batch should have been checked for certificate availability, visual integrity, sterility and fertility. The plates should have been stored according to the manufacturer’s recommendations and should be within the storage conditions and period of validity insured by the manufacturer on the day of sampling until the end of the incubation period.
The circular growth area of commercially available contact plates is approximately 25 cm2.
The sampling applicator, if used, should be preliminary disinfected. At the sampling location, remove aseptically the contact plate lid and hold it side down, while holding with the other hand the applicator to be pressed on the targeted surface for 10 seconds without any lateral movement.
Alternatively, hold the plate with thumb and second finger and use the index finger to press the plate bottom firmly with a constant pressure against the surface during 10 seconds without any lateral movement.
Immediately upon sampling completion, close the contact plate with the lid and carefully wipe the surfaces with sterile disinfecting cleanroom wipes to remove any traces of residuals.
Transport and storage
Transport samples to the laboratory and store at (4 – 8) °C and process within 24 hours.
Incubation
Plates should be incubated inverted at (32 ± 1) °C.
Counting
Examine the sample plates at 24 and 48 hours. If colonies visible by eyes are observed, count and record data. Examine and record final colony counts at 72 hours. Do not remove the Petri plate covers until the final 72 hour count is made.
Controls
For each ten or fewer samples collected, also collect a 'field negative’ control, at least 3 per day obtained according to the procedure described above but without contacting the plate with the surfaces.
In the lab, create at least two ‘lab negative controls’ obtained according to the procedure described above but without contacting the plate with the surfaces.
Analyse the controls in the same way as the samples described above.
Equipment, reagents and consumable materials
R2A contact plates
Refrigerator (4 – 8) °C
Cool box
Laminar flow hood
Incubator (32 ± 1) °C
Sterile gloves
ANNEX(informative)Procedure for active air sampling
Air sampling assay
General
An active air sampler is used to collect air samples using sterile gelatine membrane filters in order to determine the microbial contamination present in the air of cleanrooms. With this assay aerobic mesophiles are determined.
Other membrane filters can be used accordingly.
Sample collection
An appropriate number of gelatine filters of each purchased batch should have been checked for certificate availability, visual integrity, sterility and fertility on R2A plates. The filters should have been stored according to the manufacturer’s recommendations and should be within the storage conditions and period of validity insured by the manufacturer on the day of sampling until the end of the incubation period.
At the sample location aseptically remove a sterile gelatine filter from its packaging and mount it on the air sampler. Collect air with a volume flow of 30 litre/min with the gelatine filter exposed horizontally. The volume of air sampled with each gelatine filter should not exceed 300 litres.
After collection aseptically remove gelatine filter from the air sampler and pack filter in a sterile transport container.
Transport and storage
Transport samples to the laboratory and store at (4 – 8) °C and process within 24 hours.
Incubation
Aseptically remove the upper part of the filter holder from the gelatine filter. Press filter slightly on the surface of a R2A plate for a few seconds until the filter sticks on the agar and discard the lower part of the filter holder.
Plates should be incubated inverted at (32 ± 1) °C.
Counting
Examine the sample plates at 24 and 48 hours. If colonies visible by eyes are observed, count and record data. Examine and record final colony counts at 72 hours. Do not remove the Petri plate covers until the final 72 hour count is made.
Controls
For each ten or fewer samples collected, also collect a 'field negative’ control, at least 3 per day obtained according to the procedure described above but without collecting air with the air sampler.
In the lab, create at least two ‘lab negative controls’ obtained according to the procedure described above but without collecting air with the air sampler.
Analyse the controls in the same way as the samples described above.
Equipment, reagents and consumable materials
Portable active air sampler with a rechargeable battery
Sterile ready-to-connect gelatine membrane filter units with a filtration area of 38,5 cm²
Sterile transport bags
R2A plates (90 mm)
Refrigerator (4 – 8) °C
Cool box
Laminar flow hood
Incubator (32 ± 1) °C
Sterile gloves
Bibliography
|
ECSS-S-ST-00
|
ECSS system – Description, implementation and general requirements
|
|
ECSS-Q-ST-70-53
|
Space product assurance – Materials and hardware compatibility tests for sterilization processes
|
|
ECSS-Q-ST-70-58
|
Space product assurance – Bioburden control of cleanrooms
|
|
ECSS-Q-ST-70-71
|
Space product assurance – Data for selection of space materials and processes
|
|
ASTM D 1193
|
Standard specification for reagent water
|
|
IEST-RP-CC023.2
|
Microorganisms in Cleanrooms
|
|
ISO 14644-1:1999
|
Cleanrooms and associated controlled environments - Part : Classification of air cleanliness
|
|
ISO 14644-2:2000
|
Cleanrooms and associated controlled environments - Part 2: Specifications for testing and monitoring to prove continued compliance with ISO 14644-1
|
|
ISO 14698 part 1
|
Cleanrooms and associated controlled environments - Biocontamination control - Part 1: General principles and methods
|
|
ISO 14698 part 2
|
Cleanrooms and associated controlled environments - Biocontamination control - Part 2: Evaluation and interpretation of biocontamination data
|
|
ISO 17025
|
General requirements for the competence of testing and calibration laboratories
|